


Hello guys! We are Nacha studio. Nacha Studio was founded in 2016 in Chengdu, China.
We see high-quality as our golden rule and devoting to build our company to become one of the top digital services company worldwide. We are going to explain our process behind the making of our project 'ZDAY-USA Soldier'.
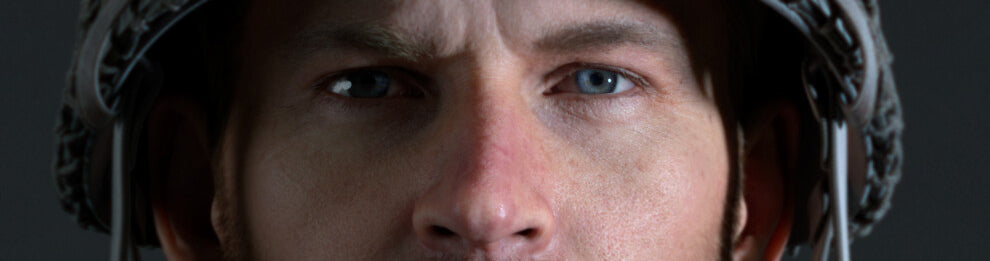
This project was made in April 2018 for Funplus. We used Texturing.XYZ's faces displacement, we think faces displacement and Multi-channel Faces are both great materials for character projects.
For this project we used :
Making of the skin
Part1. Modeling
For the head model, we used a basic model that we built in our company that already has UVs.
First of all, you have to create a simple displacement map using an XYZ displacement maps and simply apply this displacement map onto the model inside of Zbrush. This is to get an idea of the sculptover we have to do. If you don't know yet how to make and apply a displacement map, you can read this article: Discover: Surface displacement maps

After that, in Zbrush under the displacement map menu, we set a hotkey 'Q' for the 'Disp on' switch. So we can just press hotkey 'Q' to switch the displacement map on and off.
The reason why we use a temporary displacement map on the model as preview:
- Break the highlights to view the shape and adjust it more efficiently.
- We can focus more on the sculpt, even the 'smooth brush' won't modify the high-frequency details.
- Match the shape according to the details on the displacement map.

When the model is almost complete, we are ready to jump onto the next stage to make the final displacement using the XYZ maps.
Part2. XYZ displacement texture
Now we can finally use the XYZ textures to make the final and polished displacement map with Mari.
In this stage, you need to follow the tutorial in this link: Surface displacement maps
Merge the RGB channels together.

We made the background of the texture map transparent and exported in PSD format.

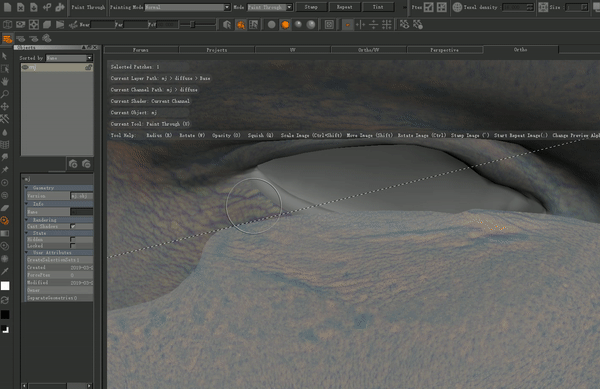
Now we can use Mari to project the XYZ displacement maps.
Go to the 'UV' viewport.

Import the 'simple displacement map' that we made before on the 1st layer.
Create a new layer and project the displacement maps on the 2nd layer.
Project the maps on top of the old one, like a placeholder or image reference, but in a second layer. This will allow you to project the image directly in the right place and to work faster.
Before the projection process. We need to set the Paint Buffer size to 4k-8k to avoid quality loss during the projection.

Choose the Color Depth you want to use. We recommend to use the 32-bit 'Color Depth' and keep the same ‘Channel’ and ‘Paint Buffer’.
Click on ‘stamp’ 
Use the ‘Pinup tool’ in Mari and match the maps' borders.
Back to the 'Ortho' viewport and fix these borders.


Then Repair some unnatural/unwanted parts and use the 'project tool'.
Tip : We sometimes use the upper eyelid displacement texture material to fix the lower eyelid.
Finally, render test the model directly in Maya or others.
Or, add new layers in Zbrush and apply the displacement map onto the model in order to refine more the sculpt.
You may notice that there is no displacement on the lips, that's because we prefer to sculpt lips in Zbrush. Slightly apply a weak lip displacement as a reference and sculpt the lip freely on top.
Important notes :
1. Make sure the skin structure and behavior are natural.
2. Keep the pixels uniform as much as possible.
3. Polish the direction of the texture on some specific areas, like nasolabial folds, fishtail lines, forehead wrinkles.
Part3. Skin shader & textures
Create nodes like the image below.
Or use XYZ Tool for Maya. And follow the process explained here: Discover Multi-channel faces.

*We only used the R-displacement texture. We Suggest use RGB mix channel and will be a better result.
We use ‘Vray Al Surface’ shader and render in V-ray.

When we start to render, we used the following parameters as a starting point.
We tweaked the following parameters in red, other properties are the ones set by default.

At the beginning of the render tests step, we keep the default parameters as much as possible.
Then for the lighting, we use some light presets from our library or recreate new lights from scratch.

Import textures you exported from Mari/Zbrush and try again.
*If you don't have rendering experience about skin shader. We suggest importing the textures one by one to test everything each time. Slowly but surely to check all aspects of your shader.
The following images are our textures and production process preview.

For the colorSpace: Set all scalar (luminance based) Textures to ‘Raw’.
The ‘diffuse color map’ as well as other color maps are set to 'Srgb'.
The following images are our final nodes and shader parameters in the end.

Just like the 'Color Space' we mentioned, these textures are in 'RAW/linear' view on thumbnails preview.
The ‘Remap Hsv’ node is used to adjust the texture slightly and achieve the look we want for the final images.
The 'Luminance' node is used to convert RGB to luminance values. You can also use this node before the displacement node.

The 'Reflection 1 Roughness 0.077' and 'Reflection 2 Roughness 0.026' Is the parameter from the 'RemapHsv' node. Just a slight adjustment, please refer to the above 'textures and Production process' for the final textures look.
*Change The ‘Reflection Distribution’ and ‘SSS mode’ to ‘Diffusion’ or ‘Directional’ based on the results you want to get. There is a more detailed explanation of the SSS in Vray here: VRayAlSurface
Part4. Making of the eye

We just wanted the eyes to have a natural look, but this is may not be physically accurate.
Our eye model and textures production process is basically the same as this Tutorial: Alfred Roettinger / Realtime Eye

This is the iris geometry preview. We used an Iris from xyz on it.

We used VrayBlendmtl, The black is transparent part with a refractive/transmission shader and the white part is sclera shader. Connect both with ramp node.
Our eye shader is almost the same as DigitalEmily2 except Turn off the ‘Affect shadows’.
You can download it and Check the detailed parameters of Shader nodes.

Then, use the ‘caustics’ and render in V-ray.
Open the ‘Caustics On’ in V-ray render setting.

Increase the caustics subdivision of your primary light.
Select your main light, Photon emission, Increase ‘caustics subdivis’ to 10000-20000

Finally. The eyes become more natural.

There is more information about the use and setting of caustics. Please check V-ray help documentation.

Thank you for reading. We hope this article will be helpful!
Feel free to follow us on our ArtStation.
| We would like to thank Nacha Studio for this work and helpful contribution. If you're also interested to be featured here on a topic that might interest the community, feel free to contact us! |