


Daniel Bauer / Making of Ennea
Hello my name is Daniel Bauer, I’am a 3d Artist with a strong interest in anatomy of the human figure. After studying facial muscles, and the structure of the face I decided to apply what I’ve learned on the sculpting and texturing of this character.


I was always fascinated by the results artists got out of XYZ Textures - and after the introduction of their XYZ Multi-Channel Faces I knew this would change my entire texturing workflow.
XYZ Multi Channel maps are unique in their way as they contain high resolution data about the albedo, hemoglobin, melanin, specular intensity and displacement of human skin.
This article will focus on how to use XYZ Multichannel Maps to your advantage, and explain the techniques I applied in Mari and ZBrush.
 I like to create two separate reference boards for such projects. One to cover the anatomy, the 2nd board for mood images or work made by other artists. This will keep your focus on one aspect only and is much easier to process.
Books about anatomy by Uldis Zarins (AnatomyNext) are an invaluable resource for understanding the face structure. I also like to collect resources from classical sculptors like Richard Mcdonald, Steve Lord, Sabin Howard and Eric Michael Wilson to name a few.

PART 1 - SCULPTING
Facial anatomy can be intimidating, but it helps to think in basic terms like volume, structure, and form. Whereas Volume represents the big masses of the head, structure - the relationship between these volumes, and the form defining details like wrinkles and pores.
"Thankfully XYZ Textures will do most of the heavy lifting for us on the form aspect."
Knowledge of facial anatomy can be an advantage in your texturing process.
Understanding where the skin is close to the skull will guide you when adjusting the XYZ albedo texture to your model, as the skin gets a lighter yellowish tone when it is closer to the bone surface.
It is also helpful to learn the terminology of major landmarks to build a map in your head, this map will help you if you get lost or overwhelmed.
Understanding anatomy = asking lots of questions + gathering information.

For this project I started in ZBrush and made sure I got all of the main volumes right.
I most often use only a few brushes like ClayBuildup, DamStandard, and FormSoft.
Avoid smooth Brushes at all costs, as you want to maintain as much information as possible, keep in mind - every brushstroke you lay down equals information.
Rough unsmoothed brush strokes catch specular and help to read the model - use this to your advantage.
If you are new to sculpting heads you should download free head scans and models from sketchfab, or digital louise . Building your head based on such references accelerates the learning process quite a bit - use the vast resources we have available today.
As most 3d artists we tend to focus very much on tech instead of creating art - I learned that you grow as an artist by adapting what others did before you. Branching of from that will let you find your own voice.
At the very end of the sculpting phase you are still able to apply an overall polish to build a good foundation for the retopo, unwrapping and XYZ displacements.


When you are satisfied with the overall appearance of the face you can work on the retopology and UVs of the mesh.

I shifted the polyflow of the head towards anatomical landmarks to support likeness sculpts. If you would like to support me, you can download this base mesh on my gumroad.
PART 2 - UV LAYOUT AND PROJECTION OF XYZ TEXTURES
- UV layout in RizomUV
I use RizomUV or ZBrush for UV unwrapping and texture layouts.
After reading about TexturingXYZ I wanted to layout the UVs the best way possible to fit their textures without stretching them too much. There is no one fits all solution here, just keep in mind that you don't always project textures in software like Mari or Substance Painter, full square UVs tend to use most of the UV space but often at the cost of stretched UVs. I will come back to that when using XYZ tiled maps in 3ds Max. This step is crucial if you want undistorted projections and the most out of these textures.

This Base Mesh is still undergoing Iterations to get a better Texel Density and a Polyflow that supports important features for sculpting purposes. I also prepared an UDIM version to test it on my next character.
As the unwrapping part is done, we are prepared to match the XYZ textures to our UVs.
- Puppet Warp in Photoshop
To make things easier we can use Photoshop´s puppet warp - function to modify all XYZ Textures to match our own UV layout.
For this project I used two XYZ Multi-Channel Maps Texturing XYZ´s Female Face 45 for the main areas of the face, and Texturing XYZ´s Female Face 02 for the lips and ears.
- convert all maps to smartobjects
- apply a puppet warp on the albedo map (Edit->Puppet Warp)
- Ctrl+Alt+Drag the smartfilter to the other maps (XYZ_displace & XYZ_utility)
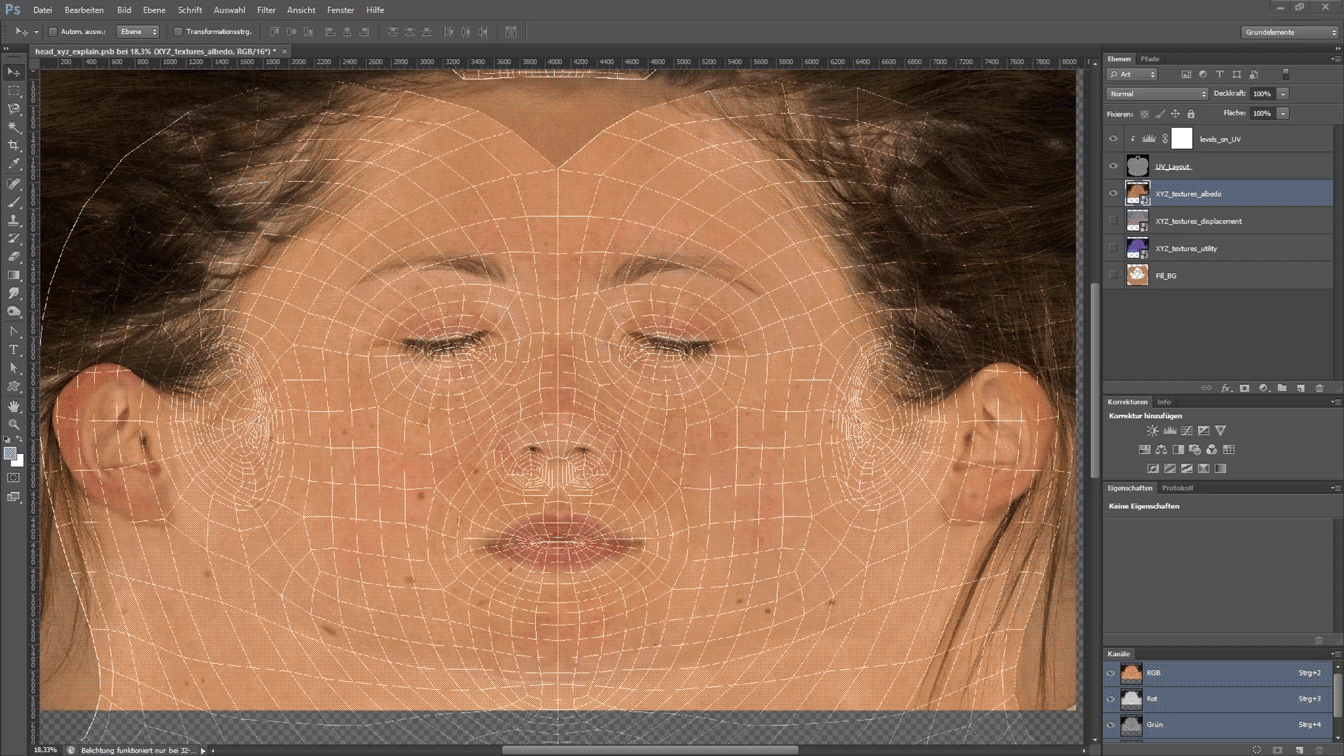
A step by step guide can be found here: Photoshop UV workflow
The modified XYZ Textures are now ready to be exported and used in Mari.
- The setup in Mari
After editing the XYZ textures in Photoshop you can load the mesh into Mari and import the modified XYZ textures to its Image Manager.
Keep in mind that Mari lets you import versions of your model - just in case you are still working on UVs or want to import a version with an open mouth or closed eyes.
You can create various channels for such projects to paint data or color information.
I ended up with the following setup:
bakes: - contains cavity, thickness, ambient occlusion, tertiary and micro displace
Diffuse Color: - XYZ albedo plus all hand painted layers
Displacement Map: - XYZ Displacements
glossiness: - blurry representation of gloss and non gloss areas
specular: - 1st spec lobe information
specular_secondary: - 2nd spec lobe information
sss_deep: - subcutaneous layer of the skin
sss_mid: - dermis layer of the skin
sss_shallow: - epidermis layer of the skin
sss_deep_mask: - mask to be used in VRay
utility: - contains XYZ hemoglobin, melanin and specular information

I wanted to take advantage of the XYZ tertiary and micro displacement information and
multiplied them on top of the main specular map. Skin pores have a very complex structure in reality - we mimic this effect to support the shader and therefore lower the specularity.

I also used this procedure in Mari´s Node tree on the Diffuse and SSS maps. It is important to work with folders and keep the maps untouched if they are instanced across channels.
Mari can handle large textures and many UDIMs but when the Software slows down on your machine it might be time to cache layers to optimize performance.
Expensive layers are marked by a red color in the layers menu - this can be the result of using mask stacks or especially on layers on top of the layer stack that are built upon many layers below.

Cached layers will be visualized by a blue color and a locked icon = better performance
The XYZ Albedo was imported as a base layer and I added various colorful layers to make her look younger and more alive.

XYZ´s Utility map was invaluable as it provided perfect hemoglobin information. Choose the “color” blend mode to apply the hemoglobin map and add a mask stack to grade or modify it to your likings.
Mari´s neat node tree helps us to keep everything flexible and organized.
It is the place where you can visualize instanced channels or layers and change connections or blend modes.
The maps I instantiated are located near the head - branching out to various channels.
I added quiet some layers to the XYZ diffuse, mainly subtle variations, procedural noises, and blemishes. I also extracted the hemoglobin content of the XYZ Utility map to emphasize the blood vessels on her cheeks.

Mari´s VRay Shader can be handy to visualize the combination of the projected maps.
- Use the albedo channel for the Diffuse Color
- the specular channel for the Reflection Amount,
- the glossiness channel for Reflection Glossiness and
- the displacement channel for the Bump Map. (I used a “copy channel” to isolate the tertiary information of the displacement channel)
A fresnel IOR of 1.380 to 1.450 should be used to match the reflectance behavior of skin.

When you are satisfied with the results you are ready to export all maps from Mari using the export manager Channels->Export Manager


- mixing displacements in ZBrush
Before we use the exported displacement maps in 3ds Max we should apply more details in ZBrush. The importing process is covered in detail by artists on this site, so I will keep it to the minimum.
- import maps as alpha or texture and flip V
- copy and load them into the displacement tab
- adjust the intensity
- create a new layer per map and apply the displacements

You might want to keep the imported XYZ displacement maps on separate layers and leave them untouched. Instead of destroying their information you can create a “corrective” layer to clean up strong displacement information, like in my case on the XYZ secondary.

If you're missing details on some areas you can use a neat little trick to amplify existing details :
- create a new layer
- smooth out the areas that lack details
- set the layer to a negative value, done!
After I added a couple of detail layers with noises and hand sculpted informations I exported the displacement map as a 32bit exr in 8k.
PART 3 - SHADING AND SCENE SETUP
- The displacement composite
I used 3ds Max and VRay + VRayDisplacementMod + VRayALSurfaceMtl to render this character.
The XYZ displacement went under a lot of modifications by now, from puppet warp in Photoshop, to a cleanup in Mari and adding details in ZBrush.
But we don't have to stop there. Texturing XYZ offers tileable microskins which will help us to break up the specular highlights on some areas. Having clean undistorted UVs now gives us the opportunity to use these maps wherever we want - without the necessity to project them in 3d:

I used the composed 8k Displacement map from ZBrush as a base, reinforced the tertiary and micro details a bit more and added the XYZ microskin tiled textures on top at various masked areas.
Make sure to shift the mid-value of the XYZ microskin textures by -0.5 to have it set at zero. This will give you the correct results when they are added to the ZBrush displacement map. More on that behalf: discover microskin

(Zbrush Displacement value lowered for demonstration purpose)
Adding XYZ microskins directly to your shader leads to a massive quality improvement and keeps the process flexible + leads to faster feedback. You therefore don't need to adjust maps in ZBrush or Mari again.
- the skin shader
To get the best results out of the VRayALSurfaceMtl I used 3 textures (sss-deep,mid,shallow) to emulate the various layers of human skin.
I also applied 2 specular maps to control the specular intensity. Skin shader models
simulate specular energy by dividing them into 2 specular lobes which can hold different gloss, IOR and BRDF parameters. Thus letting reflected light spread out more or less where it hits the surface. Both of those specular information will be added by the shader to result in a total specular.

The glossiness map authors only low-frequency details and supports the shader to emulate oily build-ups on the skin.
- the lights and studio
Following Westcott Lighting on Youtube helped me to grasp an idea of good portrait lighting.
Therefore I used a strong modifier as 1 key light (beauty dish mapped as hdr) and 2 rim lights (Softbox hdr). In Addition to that I placed 2 lights to brighten up the hair.
2 reflectors were used to fill the shadows on her neck and hair.

To control spill light and get a sharp edgy light transition from the cheeks to the front of the face I placed black flags to her sides and on the ground.

![]()
CONCLUSION
During this project I learned much more from wrinkles and pores of XYZ textures than by studying photos for hours. With scanned data at hand you can match the textures to your mesh and understand everything you wanted to know about skin details of any age and type.
Thanks to TexturingXYZ for the great content and giving me the opportunity to share my process with the community.
Daniel Bauer
https://www.artstation.com/danielbauer
https://gumroad.com/danielbauer
| We would like to thank Daniel for his helpful contribution. If you're also interested to be featured here on a topic that might interest the community, feel free to contact us! |