


Adam O'Donnell / Making of Obi-Wan Kenobi
Hi, my name is Adam O’Donnell, I’m a lighting and lookdev technical director working in the VFX industry. When I’m not working on lighting projects I enjoy creating realistic portraits and characters in 3D. During the later stages of my projects I use my production knowledge of lighting and lookdev to help me achieve a highly detailed and realistic look.

I’ve been using texturingXYZ’s maps for a few years now and I really enjoy how easy they are to use and the level of detail they give to the model without going in and sculpting that detail by hand.

On this Obi-Wan Kenobi project I used two multi-channel face maps in order to achieve the correct skin type and level of detail I wanted to go for. It was a real benefit to me that I could interchange and combine these maps to get a bespoke look.

REFERENCE
At the start of every project I always try to collect good reference of my actor or character. I think this can be a bit time-consuming and maybe a bit boring when you just want to get straight into zbrush and start sculpting but I think it’s an integral part to getting a good likeness and a realistic result.
I usually start by collecting about 20 images of both the person and then maybe the character (in this case, Obi-Wan) Then as I’m working on the project I keep adding to my reference folder. I like to look for reference under different lighting conditions but also getting a few different angles of the person on the same day under the same lighting conditions can be really beneficial to finding the forms.

MODELLING/SCULPTING

My process when I sculpting is to take it slow. I split my sculpt into a few different stages.
Stage 1 : Blockout
I usually start with a base mesh and load my front reference into spotlight, I push and pull the overall scale of the head then the main landmarks of the head (eyes, nose, mouth, ears etc) to line up with the reference. I then do the exact same thing with a side view, and a 3/4 view, all in the lowest sub-D.
Stage 2 : Likeness
I repeat the same process here moving the sub-D up to 2, 3, and 4, using a variety of different references, holding back from breaking the symmetry until my overall forms get closer and closer to the referenced person’s likeness.
Stage 3 : Detailed Likeness
I’ll now go into the two highest sub-Divisions, and start sculpting in the details of the face such as the major wrinkles and small moles that really make a person look the way they do. I tend to refrain from doing the micro wrinkles and details until I’ve got the texturingXYZ maps onto the sculpt.
UV MAPPING
Once I’m happy with my sculpt, I then pick a sub-division that I want to work in for the rest of the project, for example, the sub-div I will eventually render at or the sub-div my textures will be applied to. For me, in this project it was sub-D level 2.
I export the model out and bring it into Maya. I want my model to hold the highest resolution in the face so I split up my UVs into two UDIMs, one for the head and one for the neck. I then make sure the largest part of the UDIM is reserved for the face and for the areas that will be covered by hair such as the back of the head I give less UV space to. Once I’m happy with the layout, I export out of Maya, and Import it back into zbrush to update my sculpt’s UVs.

PROJECTING THE TEXTURINGXYZ MAPS IN WRAP
For this stage I use the same process as many of the great artists on the site have used in the past. In my Obi-Wan Kenobi project I repeat these next steps for both TexturingXYZ maps that I use. The two maps used on this project are Female 30s Multichannel Face #07 and Male 40s Multichannel Face #70.
I create a poly plane in Maya and change the width and height to the resolution of the TexturingXYZ image. I then divide it to 250 by 160 and turn off Normalisation. I then scale it into position and try to line up the eyes, nose and mouth as best I can.

Inside of zbrush I duplicate my sculpt and decimate it to make it a bit lighter to export.
I import both meshes into Wrap3D, assign my image to the plane and use the selectPointsPairs node to match the points of the image to the decimated sculpt geometry. You have to make sure each point number matches on both the image and the model, otherwise you will get unwanted results.

Once all the points are matched up I compute the wrap. This will wrap the plane around the model giving my a 1 to 1 line up for my projection onto the UV’d model.
I bring the wrapped plane into zbrush where I will need to do some clean up on some areas. I do this by a mixture of pulling the mesh into position to line up better with my model and then use projection on masked areas to re-project the wrapped plane onto the mesh, then I just smooth those areas out. Sefki Ibrahim has a great tutorial on this process.


Once I’m happy with the clean up I’ll export out both the wrapped plane and the UV’d model back into Wrap for the texture projection.
I set my transfer texture node to 8k and hook up the wrapped plane with my color map and then hook up my UV’d mesh.

I repeat the same process for both the displacement and utility map as well as the second TexturingXYZ map I want to use.


DISPLACEMENT CLEANUP IN MARI
Before I can use my new displacement maps in zbrush. I first want to split them out into the R, G, B channels, and also clean some areas up inside of Mari.
Like I said at the start of the tutorial, I used a mixture of two multi-Channel maps in this project to get the look I wanted. Everyone’s skin complexion is different there are 3 types of skin, dry/normal, oily, and combination. Although I was happy with the skin detail in the color map in the Male 40s Multichannel Face #70, the displacement skin detail had a dry skin type and I knew that by looking at my reference Images, Ewan has more oily to combination skin type.
I wanted to try and use another multi-Channel map I had (Female 30s Multichannel Face #07 ) to see if I could combine them to get the look I wanted. I was worried the two Displacement maps wouldn’t work correctly with the color map, but because all the light information had been taken out the color map, the two displacement maps combined perfectly with it.
For the displacement cleanup, I start out with a 50% grey base then add my two displacement maps on to new layers, I then use masks to paint out the areas that are unwanted, on a new layer I ended up projecting the eye displacement from the male map but I could have just as easily painted it in my mask on the female disp layer. After that I use a cleanup layer to remove things like eyebrow hair, eyelashes, and any abnormalities from the texture transfer. Using a 50% grey brush will remove any displacement.

I then use a copy channel layer to split out the R, G, B channels and save them each to a new 16 bit .exr file.
ZBRUSH DISPLACEMENT

Back in zbrush, I’m now ready to apply my newly split out Displacement maps onto my sculpt.
In layers, I create a new base layer that will just contain the information of my base sculpt without detail. Then I create 4 more layers, one for each of the R, G, B displacement maps, and one that will be used as a cleanup layer and extra details.
I import my images one by one and flip the V co-ordinate on all of them as well as "make alpha."
I load the image into the displacement slot, choose a suitable value, and apply the displacement to my mesh. Then repeat these steps for each layer. I can then control the amount of displacement applied to each layer with the layer slider.

FINAL DETAILS
Once I have all the displacement layers applied I can now start to create the final details of my sculpt. Whilst looking at my reference for the wrinkles of my character, I use the dam standard brush with a very small radius and a moderate intensity and I start to draw the lines of the wrinkles by joining up the pores. I feel like this is the best way to get the most natural-looking wrinkles.
For any large scale wrinkles from my displacement maps, I like to add a small amount of volume to the underside to try to mimic the effects of gravity. After that I add some details and wrinkles on the neck then look for any moles or scares that my character might have to improve of the overall likeness.

Once I’m happy with my sculpt I make sure I have the correct scale on my export settings and export out my model at Sub-D 2, my 32bit .exr displacement map at 8k, and a cavity map, that I might use later in Mari for painting in some of skin color details.

ACEScg
Throughout my entire color workflow I work in ACEScg. It helps me to manage my colors from one program to another and also helps me to render colors much more accurately than traditional linear workflows.
“The Academy Color Encoding System (ACES) is a global standard for interchanging digital image files, managing color workflows and creating masters for delivery and archiving.” - acescentral.com
When using any srgb textures I need to convert them into the ACES color primaries before they will work correctly inside an ACEScg workflow. Mari will do this automatically for you when you’re using an ACES OCIO Config and because of the conversion, the color values of your images will appear much darker on an sRGB monitor.
To compensate for this I use this handy image that Chris Brejon made that helps me to find the correct albedo values for materials.

*I should note that this should only be used to help you get in the general ballpark of albedo values and shouldn’t be used as absolute.*
In Nuke I open my color map within an ACES project and set the color transform to srgb-linear-texture, this will convert it to the ACES primaries. I also bring in the albedo value image above and also set its color transform to srgb-linear-texture.
Next I apply a colorCorrect node and a grade node to the color map, and then by color picking an area of skin, adjust the values until they roughly line up with the Luminance value of the light skin color swatch on the Albedo value image. With these grade values I can now apply a grade node in Mari and copy the values over from nuke to get the same result in Mari.

MARI TEXTURING
COLOR
Now that I have my base grade set up I can now work of my skin color texture.
I start off with a 2 base layers, one which is a tiled skin texture and the second which is a perlin noise, both use the same values found in the xyz color map. The next layer is my TexturingXYZ map, for the color, I only used the Male 40s Multichannel Face #70.
Creating a mask, I remove the areas that I don’t want on the back of the head and neck, that will be replaced by my base layers. Lastly I use and extra layer to paint in the color details around the eyes and the rest of the face, using a mix of noise maps and organic brushes.

SPEC ROUGHNESS
I split the Specular into two lobes on my shader. One is for the actual Specular reflection of the skin and the other is for the Specular reflection of the sweat, oil and dirt on top of the skin.
Whenever I want to paint maps in Mari, I always establish a good base value in Maya to start off with by rendering some tests and seeing which value gives me the best results. For the spec Roughness the base value was 0.42, so thats what I start off with in Mari. I then paint lighter and darker areas where the skin is rougher and smoother, and in a new layer I add the Texturing xyz Disp B channel map to add some detail, then add a cell noise layer to give it a bit of break up.
I only work with Specular Roughness maps because the actual Specular value of materials shouldn’t really change that much. It’s the micro displacements of a surface that make an object look the way it does (shiny or rough) and most of the work for a detailed spec look should be achieved with the displacement map but you can use the Specular Roughness maps to help push the extra details and really add an extra level of realism.

COAT (sweat and dirt)
For the Coat, instead of using a Roughness map I use a weight map. This allows me to paint in the areas that would have higher and lower accumulation of sweat and oil on the skin. I could also use a roughness map here in combination but I usually find its a bit overkill. Again just like the SpecR map, I establish a good base value first in Maya before taking it into Mari. Then I paint in lighter areas on the tip of the nose the eyes and lips, and dark areas on the lower cheeks and neck. I use the TexturingXYZ Disp map channel R at the end to add some detail and breakup.

SSS SCALE MAP
The last map I create is an sss scale. This is used to limit the amount of scattering that happens in your shader. The closer to the value of 0 the less subsurface scattering happens. In the shader inside of Maya, if my model is to real-world scale. I usually set this value to around 0.13, so this is a good starting off value in Mari, I then paint in some lower values where the bones of the head are closest to the skin such as the bridge of the nose, the cheekbones and the forehead, and any areas that are more fleshy will get slightly higher values.

LIGHTING AND LOOKDEV
SHADER
I like to keep my shaders as simple as possible, if I have changes I want to make to any of the maps, I always do it inside of Mari and then read them back into Maya. The only thing I have to remember is to set the correct ACES IDT for each map.
Because I’ve just moved country, I’m running my work from a very old laptop that I was able to take with me, because of that, the fewer computations my shader has to make, the better.
I like to add my TexturingXYZ B Channel map to the bump slot of the shader, just to give me a bit of extra micro details that zbrush might have missed.

LIGHTING (HDRIs)
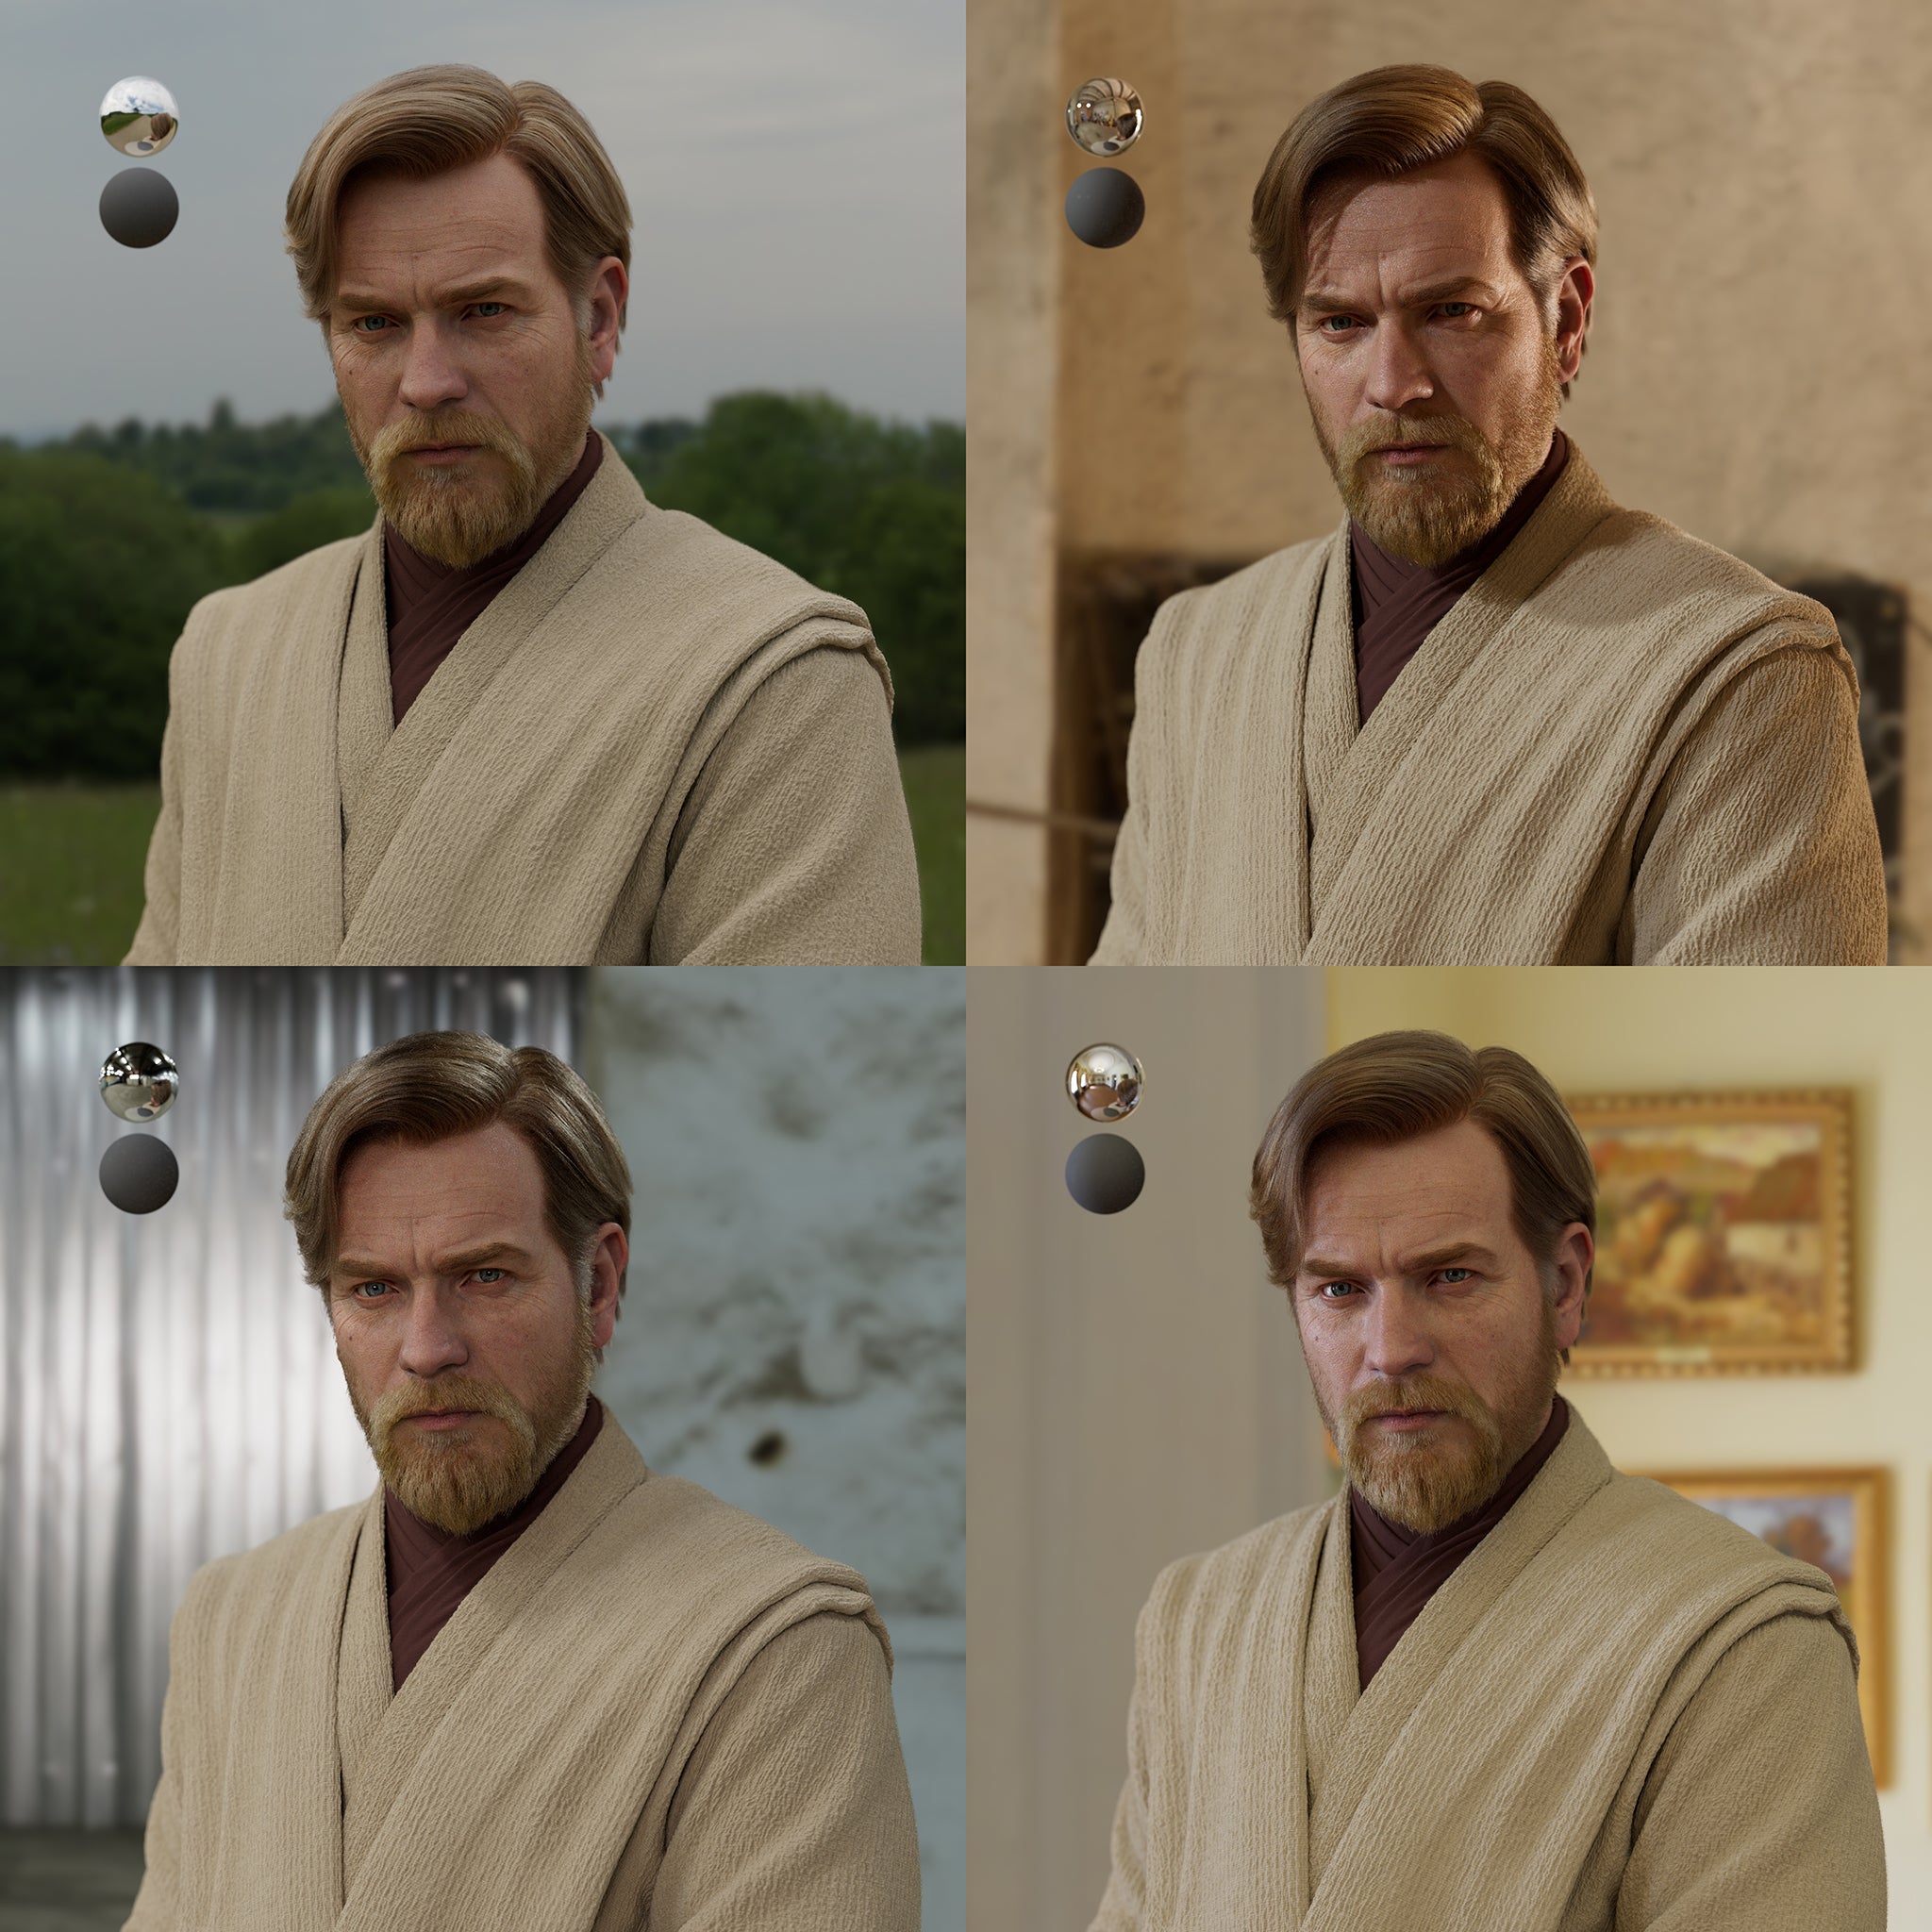
This is always the stage I enjoy the most. I have a few HDRIs converted and calibrated to ACES, I use an 18% grey ball to help me understand the direction and intensities of my HDRIs and a Chrome ball to help me understand where the lights are coming from in my scene.
Testing your shaders in all different lighting conditions is integral to a realistic shader, I also use a variety of different cameras in order to make sure everything is looking correct.
LIGHTING (CREATIVE)
The creative lighting is how I want the character to look in my final image. Originally I wanted Obi-Wan to be set into a volcanic Mustafar background but it ended up being too much work to try to develop a suitable back-plate.
I knew that I wanted to use warm lights with the color contrast of the blue lightsaber as a fill light. I took inspiration from Rembrandt’s paintings to get the shape of the key light with the small triangle of light hitting the right cheek. I think it’s always a good idea to research the old masters when looking for inspiration for your lighting.

XGEN
I’ve been looking for a good groom solution for a while now and although xgen can have its problems, I really love how easy it is to use and the realistic results it can achieve. It really gives that finishing touch to a good model also can really help with the likeness of your character.

I split my groom up into several different descriptions, eyebrows, eyelashes, headhair, beard, and peach fuzz, each using its own scalp geometry. I usually like to start with the eyelashes on a character because I feel like it’s a good entry point to get used to the xgen workflow without feeling overwhelmed. Next, I move onto the eyebrows then onto the headhair.
I start my guides off at the parting of the hair and try to get the overall shape then start adding rows of guides under the first set with each row overlapping the next.
For long headhair I usually use 3 clumping modifiers, for the 1st one I clump to guides, the 2nd is for mid-range clumps and the 3rd is for the tiny clumping that happens to a few individual strands. After this, I use a cut modifier to soften the ends and then a noise modifier with different values for the overall hair and the stray hairs with a small expression.

RENDERING
I always render my final images 4K into a multi-channel exr file. I will render out all the shader lobes that I’m using into the AOVs in case I need to make any changes in post.
In my Arnold lights, I make sure I’m using at least 2 samples, and in my Arnold render setting I set the camera samples, spec, and sss samples to 6, but I will play with all the setting to make sure I’m not over or under-sampling depending on the model.
CONCLUSION
I really enjoyed working on this project, it was very cool to create one of my all-time favorite characters in 3D. To see all the love it received once I finished it was really motivating to continue to do pieces like this. I also learned a lot working with the TexturingXYZ maps and I'm looking forward to combing more maps in the future.
I want to thank TexturingXYZ for their great content and engagement with the art community, and for giving me this opportunity to share my workflow.
Make sure to follow and support Adam on Artstation | Instagram | Patreon!
| We would like to thank Adam for his helpful contribution. If you're also interested to be featured here on a topic that might interest the community, feel free to contact us! |