


Sefki Ibrahim / Realtime Digital Double with Character Creator and TexturingXYZ

This is my first time using Character Creator as well as creating a real-time character from start to finish. I hope that this documentation can serve some insight into my thought process.
Feel free to experiment and try out your techniques when attempting the workflow. This article and the accompanying videos should serve as a loose guide for you to create your real-time character with some neat tips and tricks to try out for yourself.
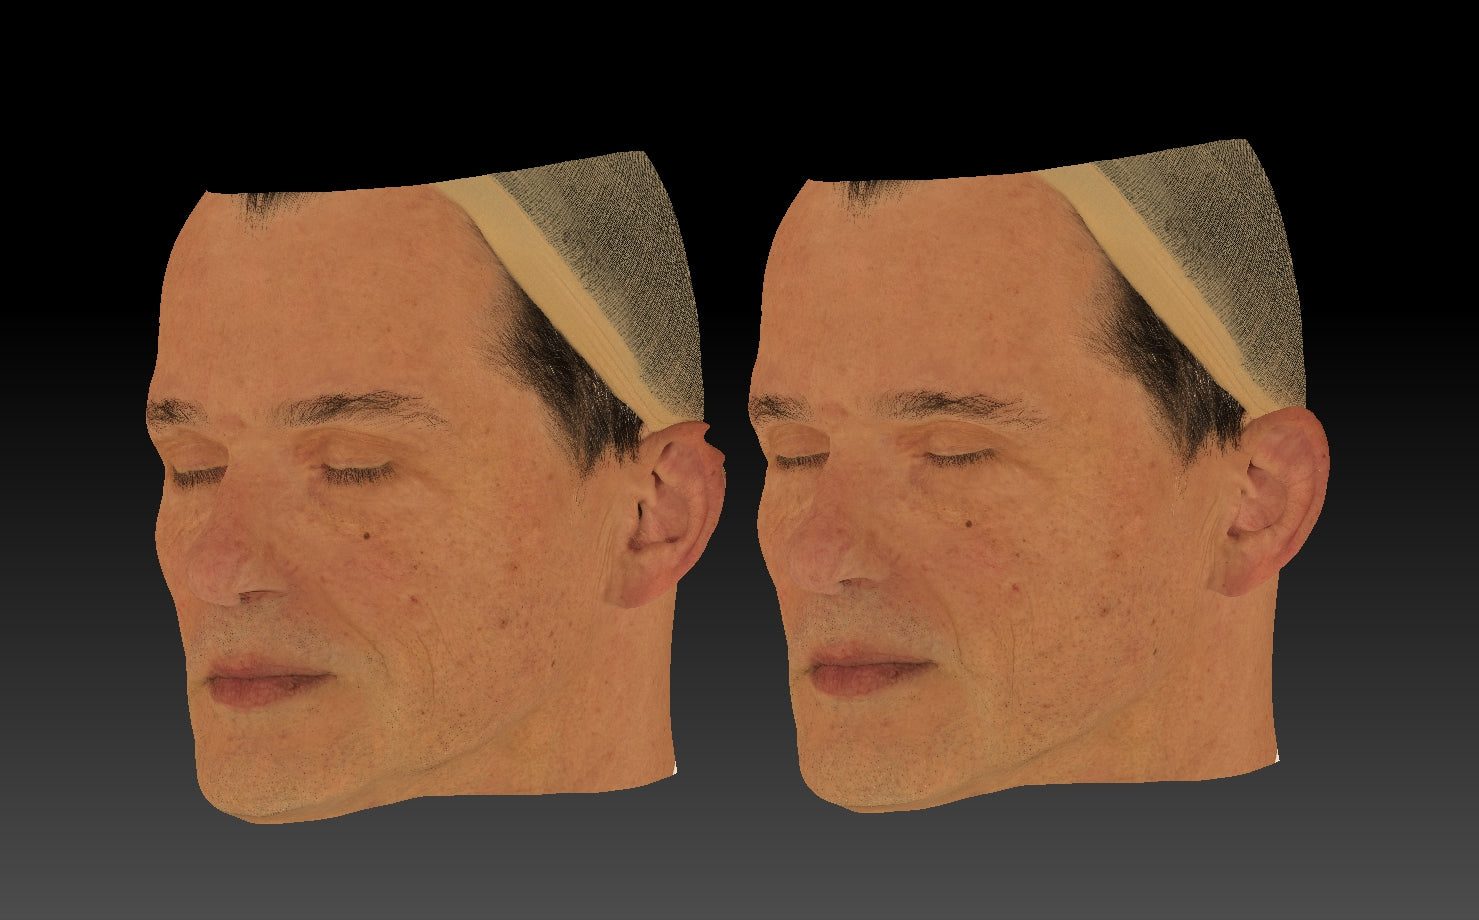
To kickstart the project, the first thing I did was choose the subject. I decided on Ed Harris, notably because he has a very distinctive and unique face - and it would pose a new challenge for me. So, I gathered a bunch of references to start me off. Then as I navigated through the project, I continued to add more references related to the stage of the workflow that I was on.
Sculpting and Utilizing Multi-Channel Face Maps
Part 1: Sculpting
- First thing I did was open the CC3+ male base into the scene and roughly matched Ed Harris’ proportions using the facial morph sliders. Mainly, I estimated the eye, nose and mouth dimensions here as this will all be appropriately sculpted once imported into ZBrush.

- To bring this into ZBrush, first, I selected the base in the Scenes tab, along with the eyes and teeth, and then pressed the GoZ button on the top taskbar. Immediately, you’ll be presented with a window, as shown below. In this case, I selected the eyelash and tear ducts, which ZBrush will import as separate subtools ‒ something that I found was more comfortable to work with through my experimentation.

- Here I began to sculpt the likeness: using this time to establish good proportions and anatomy while paying close attention to my references at all times. I implemented some secondary information from a previous project in order to quickly establish some secondary detail due to time-constraints and reworked them later after adding the displacement. Subdividing up to level 5 (subdividing this high is optional), this model will be used for projection later once I’ve textured the skin, so there is still work to do, but my main goal at this point was just to get a sense of the actor.

- Next, I selected the eyelash subtool and modified the positioning of the cards to better sit on the newly shaped eyelids. The same goes for the tear ducts, eyes and teeth.

- The model was then imported back to CC using the All button above the Subtools. Make sure when you return to Character Creator to check, ‘Adjust Bone to Fit Morph’, ‘Automatically Generate and Re-Align Tear Line’ and ‘Automatically Generate and Re-Align Eye Occlusion’, as well as the pose you originally exported out.

The import is simply just the base mesh, so there is no secondary information showing through just yet. We’ll get all of that information in after the texturing process is complete.

A note: If you wish to go back into ZBrush to make changes, you can! Make the edits to your sculpt, press the All button again and make sure to select Adjust Bone to Fit Morph.
Part 2: Texturing
Texture Preparation
In Character Creator, I added a closed-eye blendshape and a surprised blendshape using the Edit Facial option. These will be useful for texturing to make sure that I get a clear projection on the eyes and the inner lips. I exported these out of Character Creator using the settings below and then imported these blendshapes into my ZBrush scene on separate layers.

Before exporting, I polygrouped by UVs and separated the head, eye and mouth cavities from the body since I’m only concentrating on texturing the head. Then I exported the facial expressions out of ZBrush at subdivision level 3 for texturing. From experience with using Texturing XYZ maps, it’s desirable to texture with a detailed base to ensure your projection sits in correlation to the sculpted features.

Utilising the Multi-channel Maps
The Texturing XYZ multi-channel map that I decided to use for this project was “Male 40s multi-channel Face #70”. The skin texture seems to contain a lot of colour variations and wrinkles, so I thought it would be great for capturing Harris’ 60+-year-old face.
The process of wrapping the multi-channel texture on our closed-eye model is as follows:
- First, check the dimensions of the multi-channel map; in this case, it’s 9824x6190.

- I imported the closed-eyes model into Maya and created a plane; in the attribute editor, the dimensions of the plane were reduced by 1/100th of their size. So, in this example, my image was 9824x6190, so I changed it to 98.24x61.90. The amount of subdivisions is up to you, the denser the plane is, the longer it will take to wrap. Somewhere between 100 and 200 should suffice.

- Ensure to turn normalisation off and check the UV editor as you do this. The plane should encompass the entire UV-tile.

- Finally, global scale and translate the plane, so it relatively matches with the model’s features. Applying the albedo texture to the plane here will help with this.

- Export the plane out and then import both the model and plane inside of Wrap3. In Wrap, the node network is as follows. With the multi-channel albedo texture connected to the plane geometry, I joined the two models to a Select Point Pairs node. This part of the process involves picking corresponding points from model to plane, like the image below. Some areas will not wrap cleanly such as the ears, but do not fret ‒ these artefacts will be taken care of in ZBrush.

- The wrapped plane is then imported into the ZBrush scene and manipulated to match my sculpt. The aim here is to match the colour of the plane geometry to the sculpt. So I have the texture map applied to the plane in ZBrush. With the ears, for example, I force the plane geometry into the correct position using the colour as an indicator — Mask areas of the ear, project and smooth. To ensure a clean projection, I subdivided the plane geometry up to level 3.

- I regularly checked the diffuse in flat view mode to check there was no significant distortion in the map. Once I had covered the entire plane geometry and verified that the albedo map was clean, I exported the plane geometry (at level 3) out of ZBrush and into a new Wrap scene. Below is a before (left) and after (right). Notice the areas such as the laugh line where I repositioned the texture according to the sculpt.

- In Wrap, I imported the closed eyes model and the newly projected plane and attached an image node to the plane geometry. I then added a transfer texture node with the dimensions set to 8192x8192. Subsequently, I added an extrapolate texture node and transferred all three maps (diffuse, displacement and utility).
![]()
Here are the exported maps.
![]()
Cleaning the Maps in Mari
I imported the closed eye model into a new scene, and I proceeded to create three channels. I set each of these channels to 8-bit and 8K. Subsequently, I imported each of the maps into their respective channels and began the clean-up process. It went a little like this:

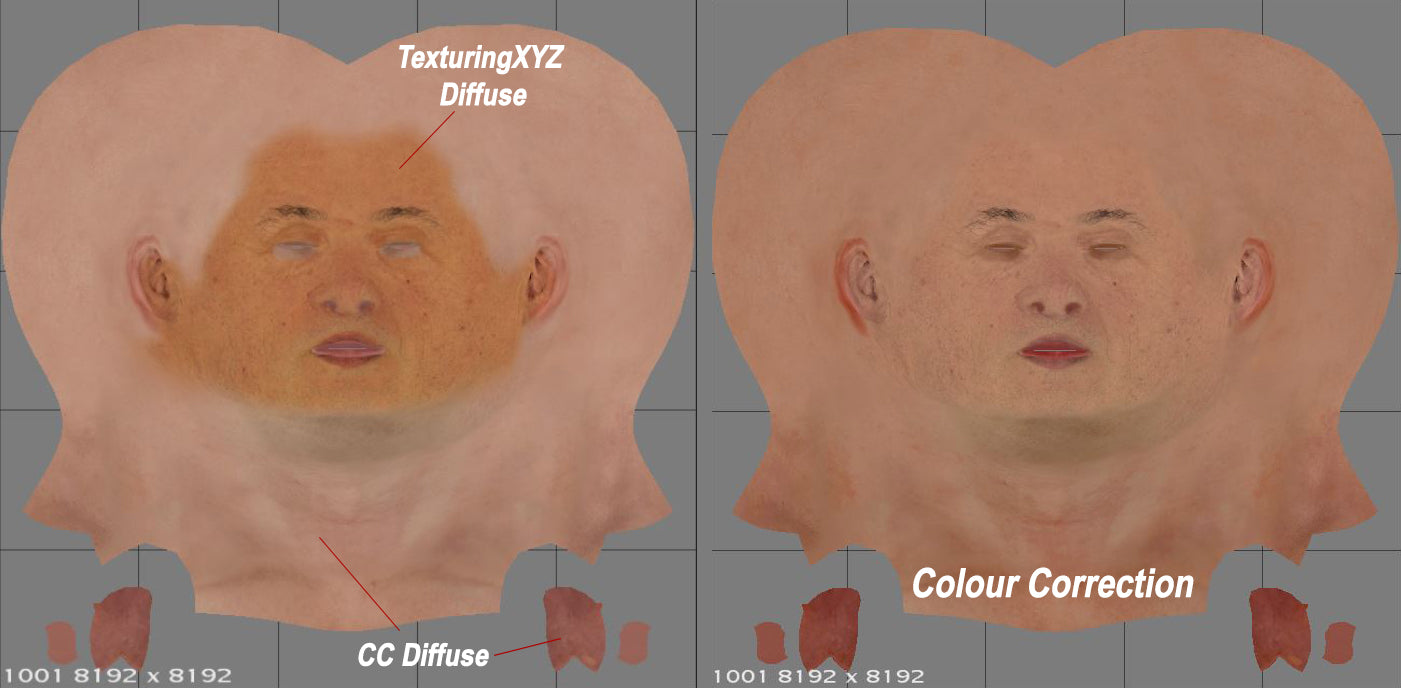
- Diffuse - I first exported the diffuse map from Character Creator (CC diffuse) to use as a fill layer. This diffuse map was imported into Mari and positioned below the Texturing XYZ diffuse map. I then added a mask to the Texturing XYZ layer and painted out all of the redundant areas, like the scalp, neck and cavities. Subsequently, I colour-corrected the layers, so they blended as seamlessly as possible.
I used the open-mouth blendshape to ensure there were no artefacts or visible UV seams in awkward areas such as the inside of the mouth.


- Displacement - The displacement requires a 50% grey colour for removing unwanted information. Below you can see a before and after. I made sure to remove the eyebrows and eyelashes here. The best way to do this is to project the original texture map: selecting the region just below the lashes (or just above the eyebrows) to paint out the hair. I used the same technique for the diffuse and utility map.


- Utility - The utility repeats the methodology mentioned above with the only exception being that I used black to paint out everything but the immediate facial region. It is optional whether you want to paint out the ears or not.


Now to export. For the displacement and utility, I added a copy channel layer in Mari and exported each of the Red, Green and Blue channels out of Mari and saved them as follows. Displacement_R_Primary, Displacement_G_Tertiary, Displacement_B_Micro. And Utility_R, Utility_G, and Utility B. This operation of splitting the map into its RGB components can also be carried out in Photoshop.

Roughness Map
There are many ways to go about creating a roughness map, and I feel it’s always a topic of discussion amongst character artists. The method I’m demonstrating here is just one way, feel free to experiment on your own.
Texturing XYZ regards the Utility-B map as a ‘fake specular’ map, which I thought would be useful as a base for the roughness. So, I imported the Utility-B map and inverted it. I also brought in the Displacement R map and inverted it. The displacement map was then layered on top of the utility map and set to multiply. Afterwards, I added a mask for the displacement layer where I painted out areas of the displacement to leave me with the map below. I made sure to have darker regions in the most specular areas of the face, such as the nose, forehead, cheeks and lips.
I didn’t concern myself too much with the look of the roughness map simply because Character Creator allows you to further alter the roughness of each region of the face with great control via sliders.


Part 1 - Part 2