


Vanni Brighella Making of Samuel Lee Jackson
Vanni Brighella is a seasoned CG artist, animator and product designer with a broad range of technical and software skills spanning a variety of artistic design fields, including props, character and environment design, and concept art. Vanni is currently based in Los Angeles working for feature, commercials and real-time projects.

Hello folks,
For this making-of article, I want to explain how I used the texturing XYZ maps through my workflow for Samuel Lee Jackson, lead actor for Shaft, 2019 and other approaches I used to develop this photo-real character.
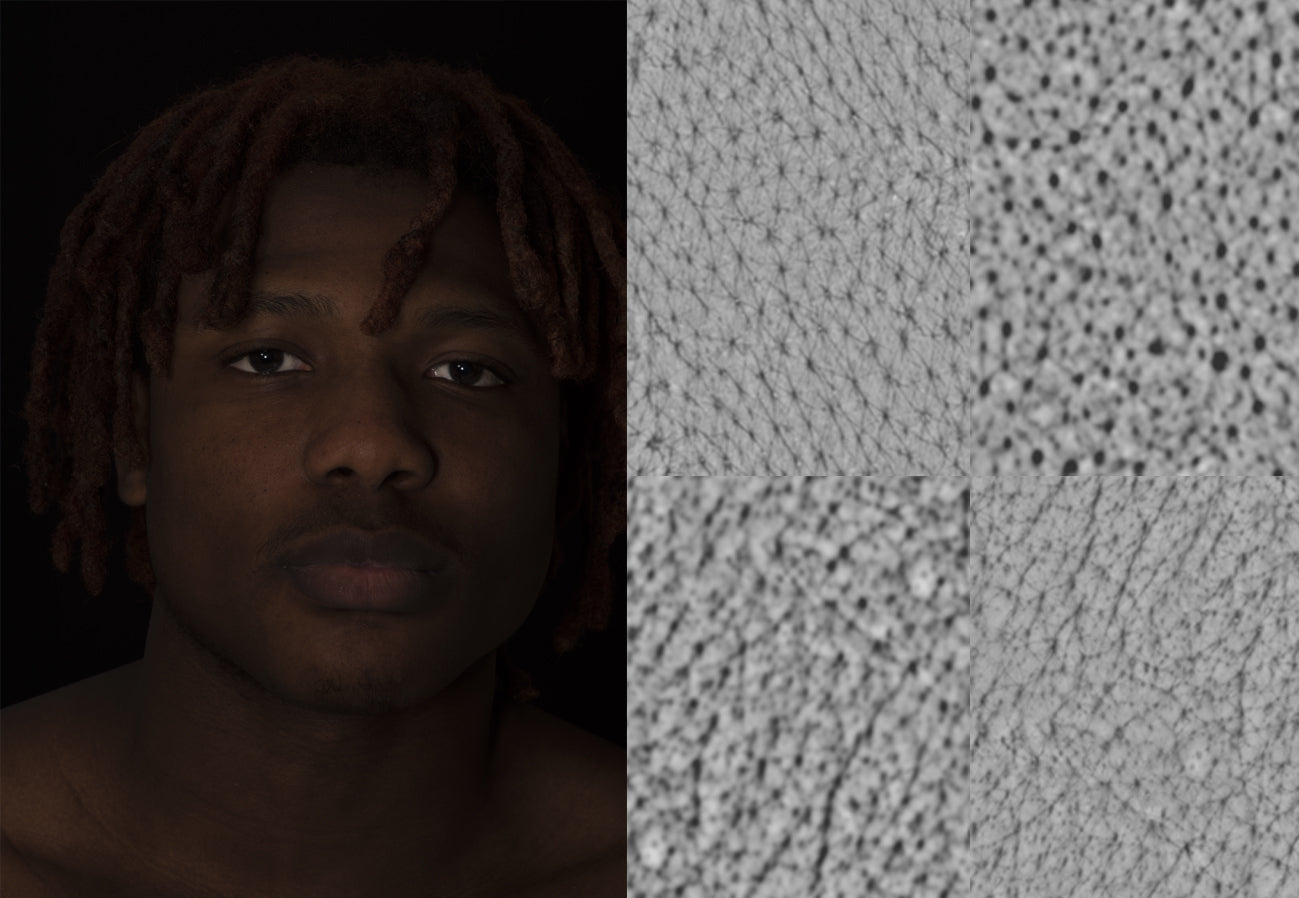
In this project, I used a combination of different maps such as Male Face 20s FullFace #42 for albedo color, tiled_microSkinFace_08_12 to improve and define the base of displacement information, and Male Face 40s FullFace #04 for the support of my skin texture.
I will also show some of the things that are important to keep in mind when you create someone who is very famous and well know worldwide. Let’s start.
- REFERENCE
As the first step, I grab as many references as I could. One of the best places to get some useful source is the internet, magazine or books. For this project, I bought a couple of magazines to find a better reference. It is essential during this step to spend the right amount of time before starting. For this step, the software that works best for me is PureRef.
PureRef is very user-friendly, and I can get and organize my reference pictures easily with the only couple of hotkeys (https://www.pureref.com/about.php). As soon as, I had Pureref held and ready to support my work. I carefully analyzed all the pictures, and I identified the useful ones; therefore, I scaled them up so they could stand from the others. Another critical thing to organize before starting modeling is to open an anatomy book. Even if it is now many years I do sculpting digitally and traditionally, I have never stopped using an anatomy reference book because it always helps me to teach my eyes to observe accurately. I always use Anatomy for sculptors as the primary source for anatomy, and I still have it open on my screen every day. (https://anatomy4sculptors.com/).

For my Samuel Lee Jackson portrait, I started sculpting with a base mesh and easily shaped carefully to the reference picture. This process can take quite sometimes because the likeness is very hard.
The sculpting process is divided by primary, secondary, and then tertiary forms. The primary structure is always the most important, and for that, I can encourage any aspiring individual in practicing with the classic technique such as sculpting with real clay; drawing some basic human shape and observe reference from the real world. At the beginning of my sculpting process, I always keep in mind that I do not need to create a high poly density model. The primary form drives my final output, and I always keep that in mind to avoid wasting time on smooth actively or remodel some areas from scratch. My base mesh is 5k, and I usually work with that density for quite sometimes before going up with subD. As you can see from the following pictures, these stages show the three critical steps during my modeling pass. There are several differences between stage 1 to stage 2 and finally stage 3.


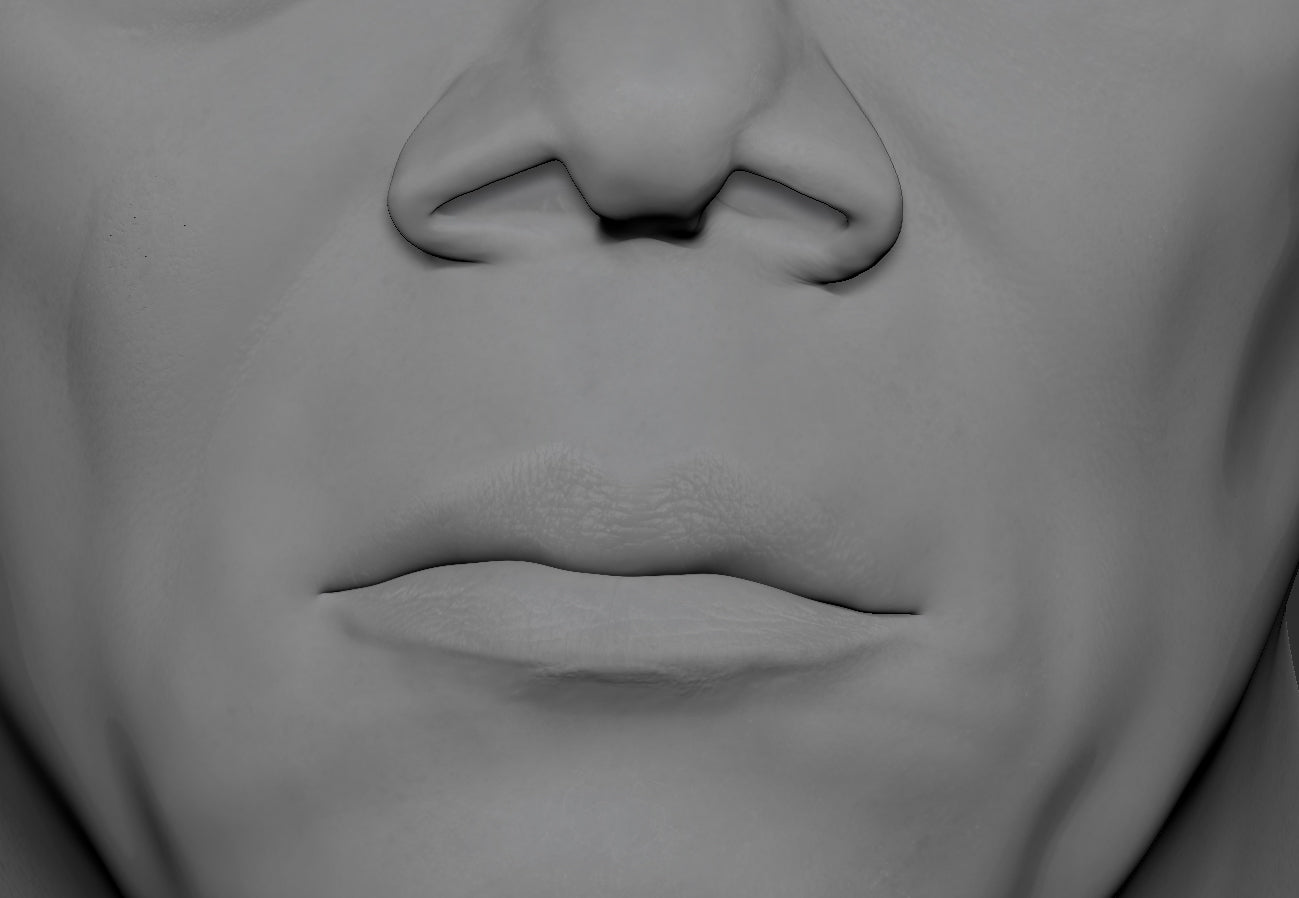
After established the primary and secondary form, I defined the likeness, and I spent sometimes creating the tiny and unique details of my character. The final touch at the sculpt is what will set apart from the crowd, and when I talk about final touch, I mean the very tiny asymmetrical face differences that we all have. In this study, I refer to unique information like the specific shape of the nose or the correct angle of the eyes. The pores and features will be added later, but they are not crucial to determinate the soul of the sculpt.
The Texturing process is a crucial phase in the realization of 3D assets, especially for photorealistic characters and creatures. I decided to use one single UDIM for the face with the resolution of a 4K map. Male Face 40s Full Face #04 scanned data pack has been used in combination with Tiled Micro skin Face maps (08, 11, 12, 17). For the albedo instead, I used the Male Face 20s Full Face #42. There are many different ways to get to the final output; the designer has to find the right for himself. For this project, I was planning to use Texturing XYZ map heavily, so I rely on optimizing a single sheet with particular attention on painting them in Mari and polish the final map in Zbrush with alphas. I could indeed perform a good test with one single UDIM, but in a professional environment, hero characters have more than one UDIM, it all depends on how close they are from the camera.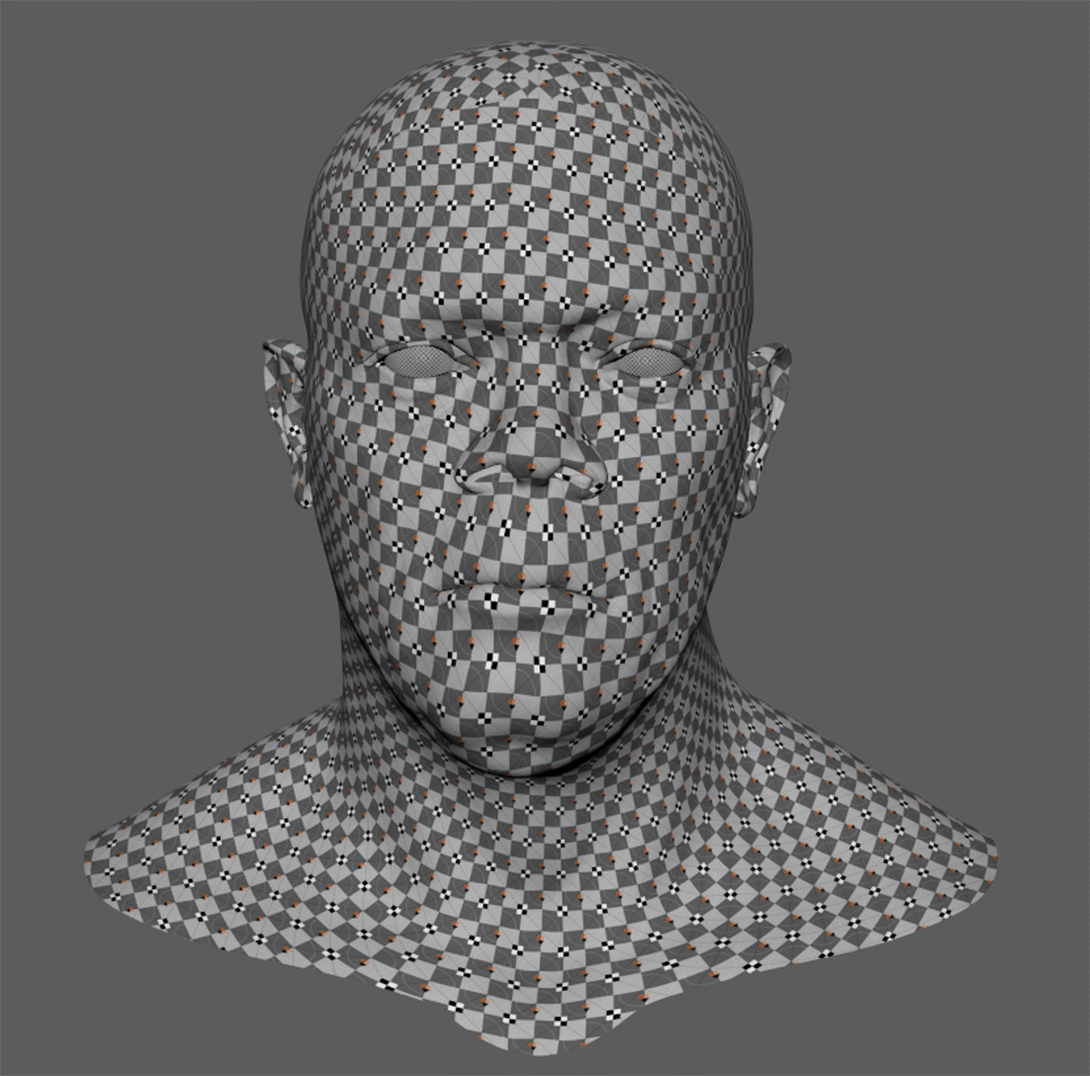
As the first pass, I combined the three different maps in photoshop on their specific RGB channel. The secondary, tertiary, and micro details were set. I knew that I want to have more control on my model, therefore; I decided to extend my texturing process with the use of micro skin face texture to clean up some areas, and color masking technique in Zbrush to have a solid base for establishing the secondary, tertiary and finally micro details. The irregularity that I achieved with sculpting micro details in Zbrush with alpha turned out nicely as a breakdown for the specularity.

For the masking process, I painted the albedo map in Mari, and I imported it into Zbrush. I flipped the UV and turned on the Texture Map.


I then clicked Mask by Color > Mask By Intensity and leave Zbrush project my albedo map mask on the model. At this point, to establish my base detail pass, I only needed to get the right brush with the right amount of intensity and project the mask on the model. I used to call this pass lower displacement frequency.
My favorite brush for this step is the basic standard with freehand output as a stroke. It gives me more freedom to play with intensity and brush size.

The lower displacement frequency gives me the direction on where my details are going to be placed based on the albedo map and set the bar for even more realism. Another crucial step in the texturing process is to paint the different texture that helps to deliver excellent final output. Here some of the maps that I prepare for Samuel Lee Jackson's portrait. I could experiment with a lot more textures than I used for this project. A good texture that always helps to emphasize the details is the cavity map baked into the Albedo map.
Textures are essential as it is essential to know how to use them. Sometimes the project does not require to have all the textures that regularly we use in production. Sometimes modify the default parameters that the shader already owns can be very beneficial and not time-consuming. Therefore, it is up to the designer to analyze what textures the model needs and what type of tweaks are necessary.

The grooming process is the most fun and intricate of all. It is imperative in this step to get so much reference you can and examine how hair behaves on a face. Different human genre and race have a different type of hair, and the most common and straightforward to create is the one that xgen gives you as default. Therefore, a good habit is to test the design on a simple primitive and then apply it to the real character. Remember, xgen needs to have Maya project set up to work correctly.
Here some useful links to improve grooming skills with xgen in Maya:
https://jesusfc.net/tutorials/
https://www.youtube.com/watch?v=6PCreLXlnVk
https://www.youtube.com/watch?v=yBzQGgMG3dg

I always like combining different techniques on my workflow so that I have more flexibility and control over my model. I found interactive grooming very useful, especially for the function of brushing your spline. It gives more artistic control over my design, and it is also essential for experimenting with the tool that Maya has. Another excellent method to establish the general grooming shape is with fiber mesh in Zbrush, convert it as curves and then with the curves (spline) we can generate a description base on the spline that we create in Zbrush. This type of method can be beneficial when we have a character that has long hair or a vibrant hairstyle.
For Samuel Lee Jackson's portrait, I decided to use the new updates for xgen in Maya. For the beard, I played with the interactive groom and with four grooming that you can see here identified with four colors: red, blue, aqua, and yellow. The length of each of the splines is different, and I chose to do it because I was planning to diversify the four grooming later with modifiers.

More descriptions I create and more control I have. Remember that real hair has so many variations so I could either play with more mask maps or with descriptions. I preferred playing around with descriptions because I had a more artistic decision on how my model’s hair could be. As soon as I established my grooming method, I worked with the modifier. Usually, for the hair, I use two primary clumping modifiers, and then I start playing with noise, coil, and extra modifiers.
For this project, I approached my workflow differently. After I analyzed Samuel Lee Jackson, I noticed that his hair was more afro American style, so I realized that I needed to focus more on that aspect and emphasize noise and coil modifier. Therefore, I first created one clumping and generated a map based on the density.
Consequently, I created a Noise modifier that I left as the default setting, but as soon as I create the coil modifier, I rapidly started playing with Radius settings to achieve a more exciting look.
I finally completed this description with another noise to finalize the look that I was looking for my design based on Samuel Lee Jackson’s hair.

The similar process I used for the other descriptions. Even, eye brown has been designed to have much irregularity like real life.

Humans have hair that covers the entire face. That groom is called peach fuzz, and it is important to emphasize it too to get more realism. There are different types of peach fuzz linked to the genre, race, and age of the person. For Samuel Lee Jackson, I was able to play around with a short, irregular, and spread groom.


The scene was lit using a 2-point light setup with a skydome light. I used an excellent HDRI to be able to highlight the realism of the materials. During the shading process, testing the natural and artificial lights with different setup has been crucial to making variations along the way. I also designed to have three polygon planes on top of my model. I decided to do so because I wanted to get some vignette and shadow on top of Samuel Lee Jackson's head. Once the setup was finalized, I corrected and polished the skin and hair shader.

It was so crucial in this stage to design photorealistic eyes. Therefore, I step back to a reference picture, and I decided to create something very close to it. I did several tests, including the one-o-one. The eyes give people that natural feeling that make us who we are. "Eyes are the window to the soul." They convey something to the viewer. In the picture below, we can observe how closely I was trying to recreate that natural feeling into my design.


One of the techniques that I used in this project was to fade the caruncle on the sclera. I have achieved that result with the help of an alpha map. On Mari, I painted an albedo map that was set across the sclera and the caruncle. After I got the albedo map correctly, it has been easy to create a right alpha map for the smooth transition. I also created a ring around the iris to help the blending between the iris and the sclera. It was beneficial because it is a tiny detail that we all have on our eyes can give that new naturalism to the digital version of humankind.


While the caruncle was working well, I needed to work on the depth of the iris. I found a very useful technique that was a combination of modeling details and shading setup. I set a very soft emissive color value, and I used a ramp to accentuate the part that I wanted to highlight. I must note that these textures can be also be animated with a time node connects to them. It is something to consider for getting even more real natural feeling inside the eyes. In production, we already animate normal maps and displacement, so it depends on how deep the designer wants to go into the process.


The final output has been developing through the different tests on the shaders and lighting set up. I finally concluded my work on testing Arnold GPU renders. The optimization that I designed allowed me to play around the model with a full range of lights and shadows set up with a result as in real life.

For Arnold GPU, I would suggest modifying parameters into the rendering parameters. On the system panel, I changed Render Device to GPU (BETA); then, I went to the Arnold Renderer panel, and here I experimented with Camera (AA) and Adaptive Sampling.

I set the Camera (AA) samples to around 3 or 4. The higher the number of Cameras (AA) samples, the less of a speedup I could get from adaptive sampling, so I decided to go with 3. I set the Adaptive Threshold to something like 0.010 or 0.02. For less noise, I would suggest less, but I set mine at 0.020. Finally, for Max. Camera (AA) the range would be between 30 to 60, depending on your scene. I decided to go close to 100 because usually, max samples should be of substantial value. Value means that the quality is controlled by the noise falling under the threshold, instead of clamping to the max AA.


Thank you for reading the article!
https://www.vannibrighella.com
https://www.instagram.com/vannibrighella
https://www.linkedin.com/in/vannibrighella
| We would like to thank Vanni for his helpful contribution. If you're also interested to be featured here on a topic that might interest the community, feel free to contact us! |