Surface displacement maps
The displacement textures provided by Texturingxyz are separated in 3 different files: secondary, tertiary and micro textures. Knowing that they are all coming from the same subject, it is better to project them all in one time. Note that if you bought a body displacement you’ll find only the secondary and tertiary files. The micro texture files are not essential for body projections. You can still purchase them separately in the displacement files sections.
Before getting further into some workflow explanations we have to understand that the skin has different level of bump. The first one is the secondary. It corresponds to the visible wrinkles, beauty spots, the lines around the eyes and all the volumes that create the pulpy feeling of the mouth… it differs from one model to another because of many factor. For example an older person will have more wrinkles overall his face than a young one. Male and Female skins are also different.
If we cut further into the skin we’ll have some deeper details that are the continuity from the
secondary: this is the tertiary. It corresponds to all the crisp details of the skin.
Overlaying the secondary and tertiary, we have the micro displacement. This one is the less visible
and is recognizable mainly on extreme close up. It greatly helps to sell the realism of the skin by
adding some subtle variations over the roughness specularity of the skin, some real fine bump and
more…
All the facial displacement files provided by Texturingxyz contain these 3 levels of displacement
present in separated files. For the body displacements, you’ll find the secondary and tertiary layers.
3D painting packages like Mari or Mudbox allow to do multichannel projections. For this reason, we
will see how to merge our secondary, tertiary and micro files in only one single 3 channels texture
file. This workflow allows us to save a huge amount of time.
We will start by merging them in Nuke. Know that it is also doable in Photoshop, the process will be
explained later on.
Nuke Workflow :
1. Gather all the files from your displacement Archive in nuke. We will merge them together in
order to project them in Mari or Mudbox.

2. Create two copy nodes, one for the tertiary and another one for the micro. We have to
transfer their red channel in the green and blue slots of the secondary.

3. Copy the red channel from the tertiary read over the green slot of the secondary. Then, do
the same process for the red channel of the micro, but instead of the green slot we will use
the blue one. We have now a 3 channels file ready to be paint in our 3D painting package.
This step will give us the great access to multichannel projections.
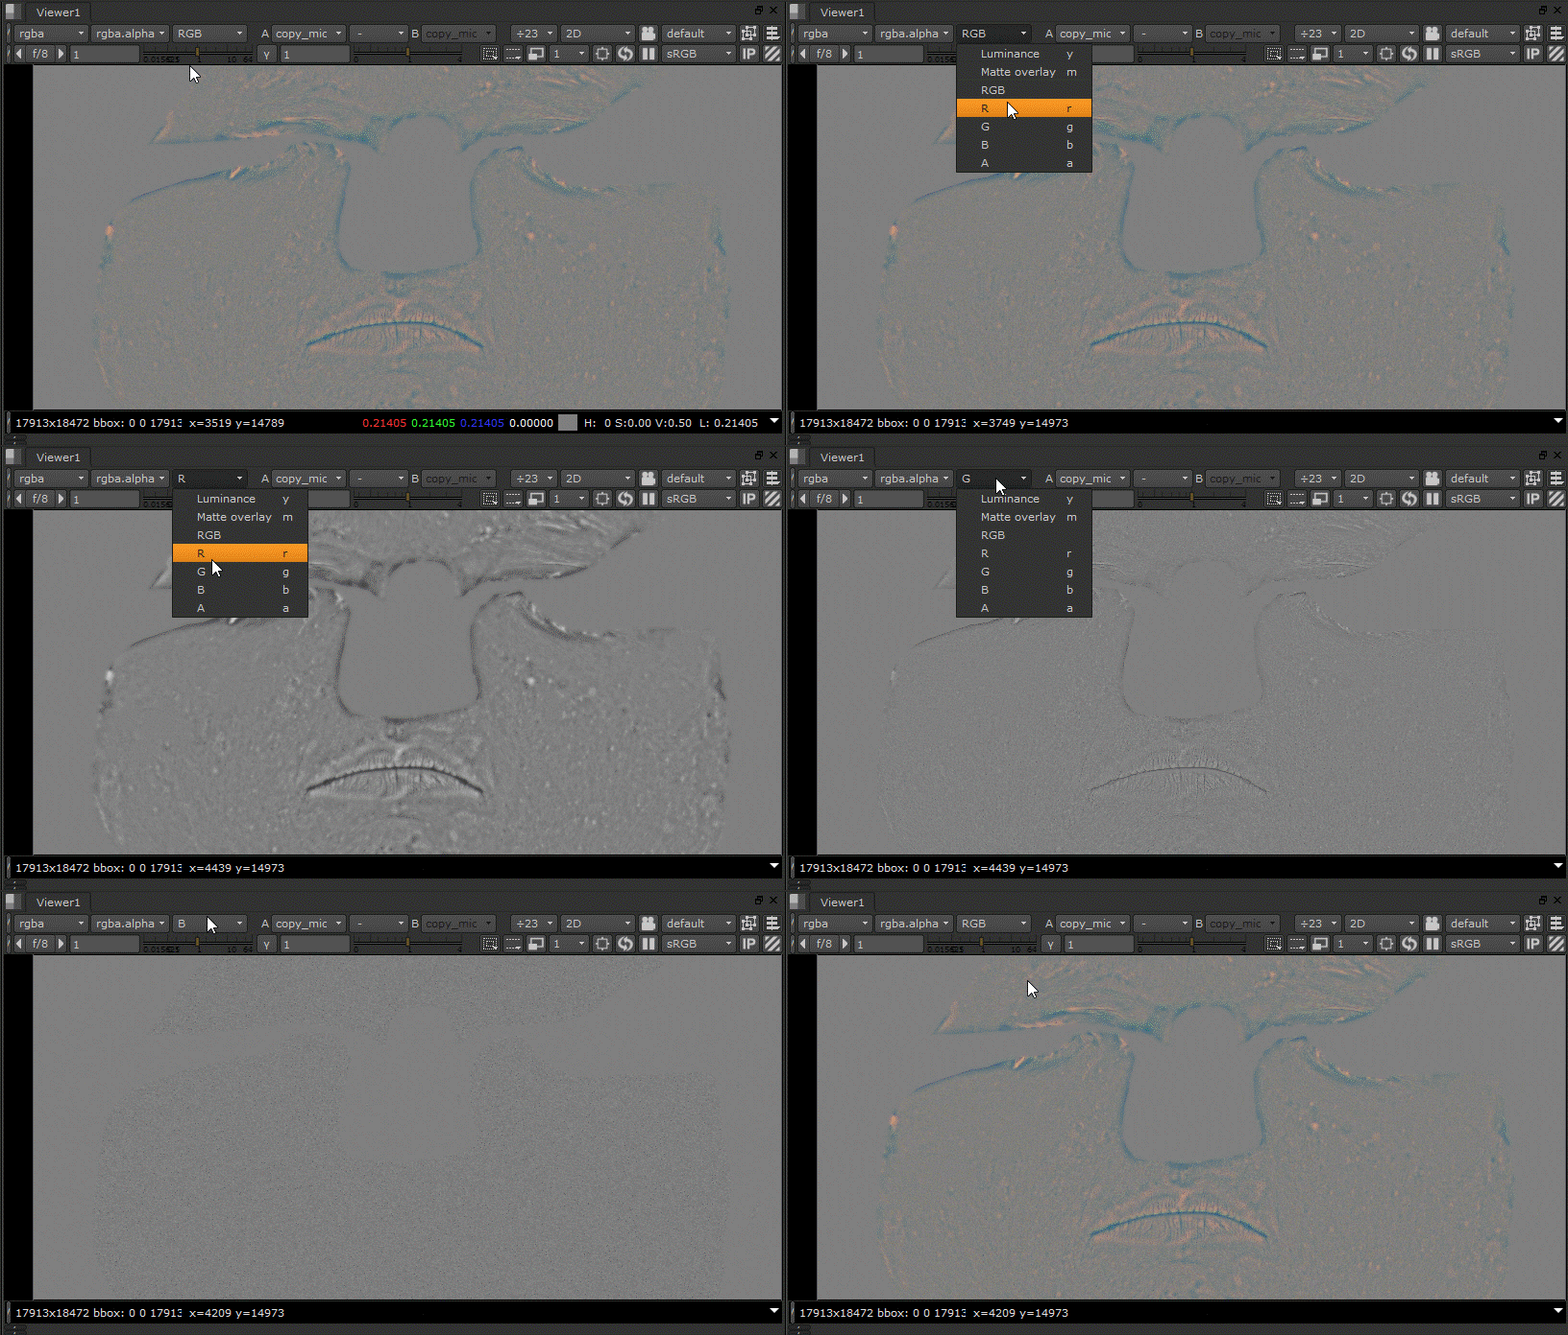
4. Before using it your 3D projection package, you have to crop your new document. Mari’s
Paint Through tool does not handle file higher than 16k resolution. For this reason, I’m
dividing it into 3 parts that I think are obvious: Forehead, Nose and Face.

5. Your file is now ready to be used in Mari and Mudbox. You only have to export it, using a
write node, in your favorite texture file format. I’m using EXR, with a depth of 32bits, in order
to keep all those amazing values coming from Texturingxyz files.
Photoshop Workflow :
Now that we have seen how to merge multiple channels in Nuke, we will see how to do the same
process in Photoshop.
1. Start by open all of your Texturingxyz’s files in Photoshop. You’ll see that the files provided
have only one channel each.

2. Create a new 3 channels, RGB, document with the same resolution as your current
Displacement files and a 16bits depth. For example the female face is 17913*18472 pixels.

3. Copy the available layer of your secondary file in the red channel of your new document.
Then you’ll have to do the same process with the tertiary map by pasting its layer in the
green channel of your new document. And finally, you have to copy the micro’s layer over
the blue channel. Your new document is now ready for a multichannel projection.
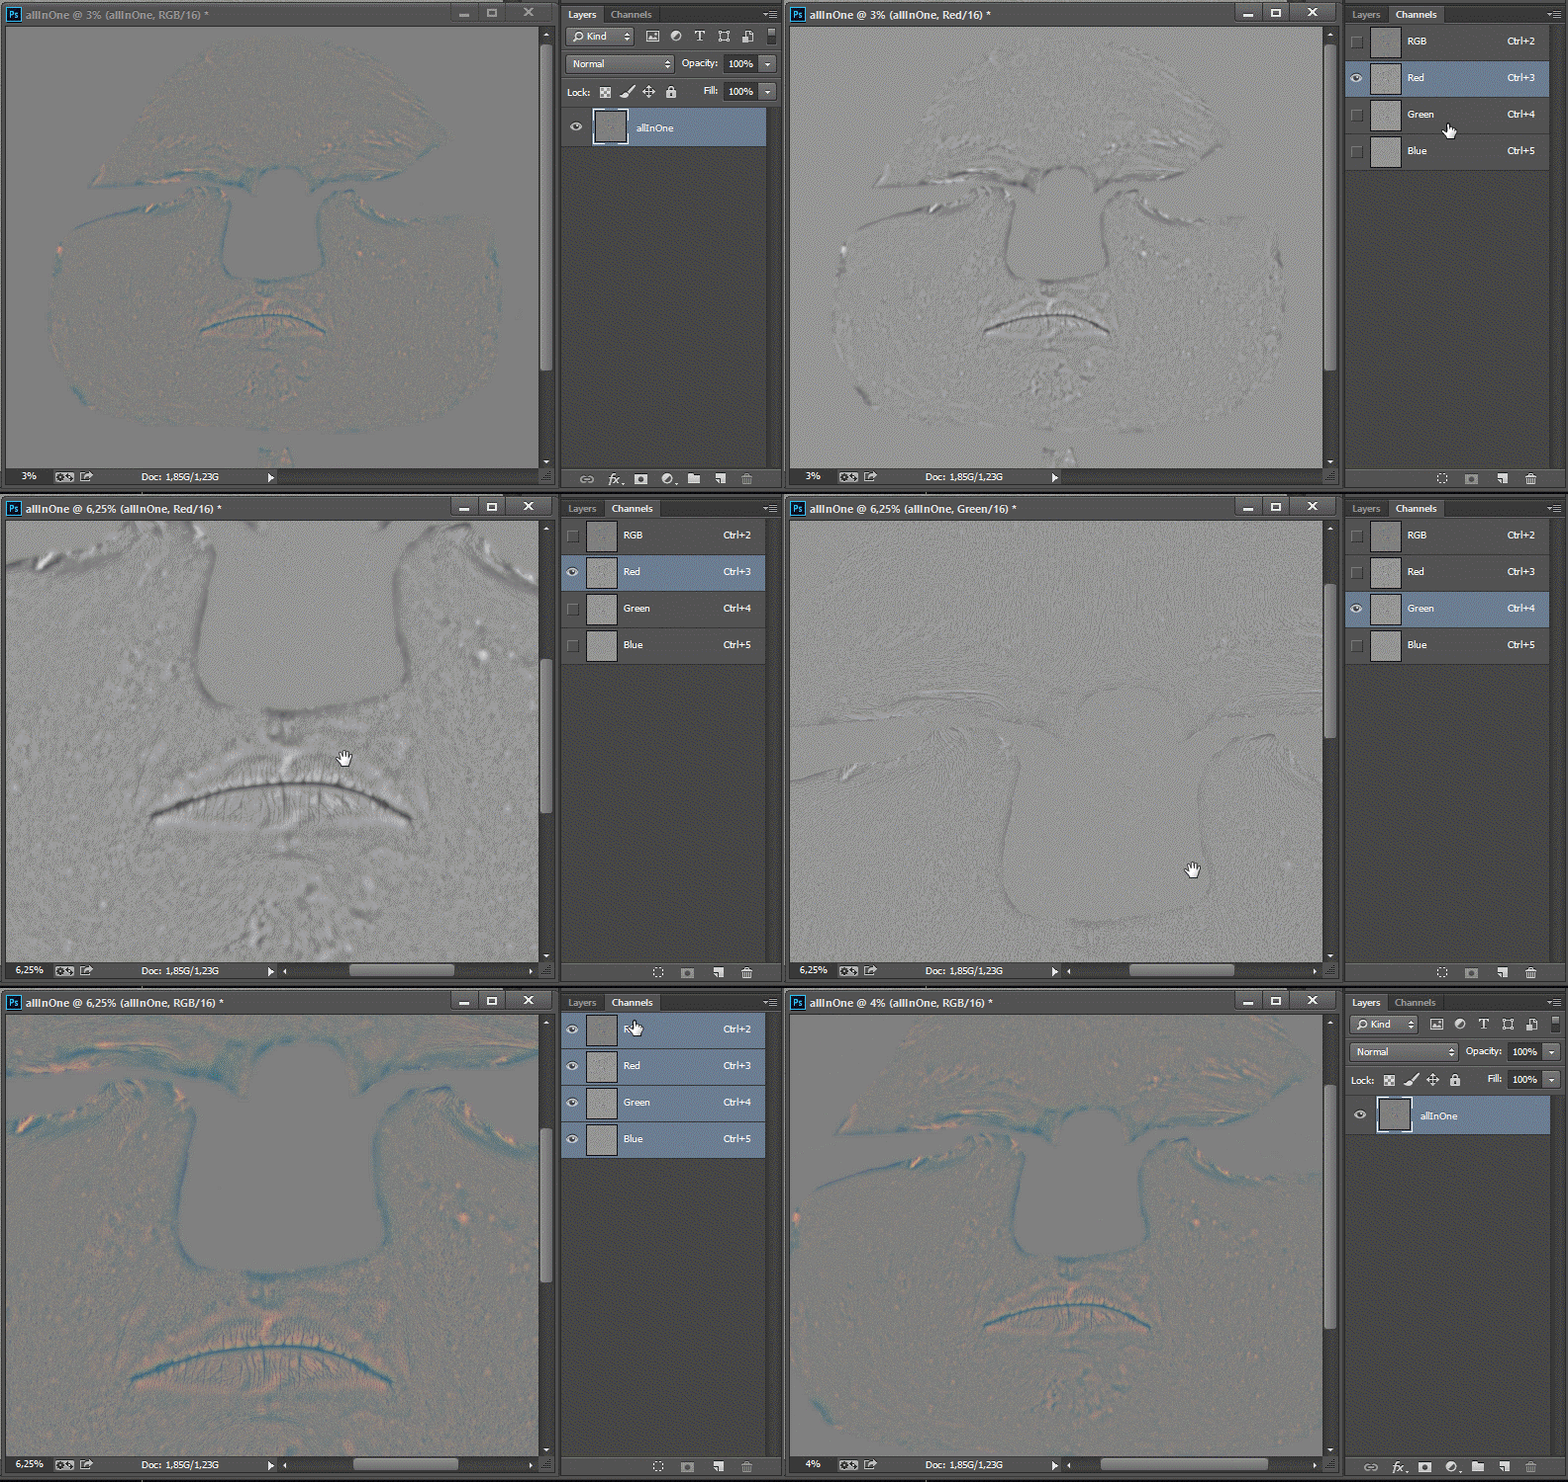
4. Before using it your 3D projection package, you have to crop your new document. Mari’s
Paint Through tool does not handle file higher than 16k resolution. For this reason, I’m
dividing it into 3 parts that I think are obvious: Forehead, Nose and Face.

5. You can now export each part using your favorite projection file format. Coming out of
Photoshop, you can use a simple .tif extension, with no compression.
How to use our newly created texture files in Mari :
We will now see how to do multichannel file projections. It is quick and easy to get a great result
thanks to Texturingxyz’s displacement files. I will show you how I use them inside of Mari.
Knowing that we are going to project really fine details onto our models, we need to have a great
definition for our maps. I recommend you to use multiple tiles, using UDIMs.
Following is just one of the several Workflow that you can follow. They are other methods available.
Feel free to use than one you like.
1. Inside of Mari, start by importing the projection files you created in Nuke or Photoshop.
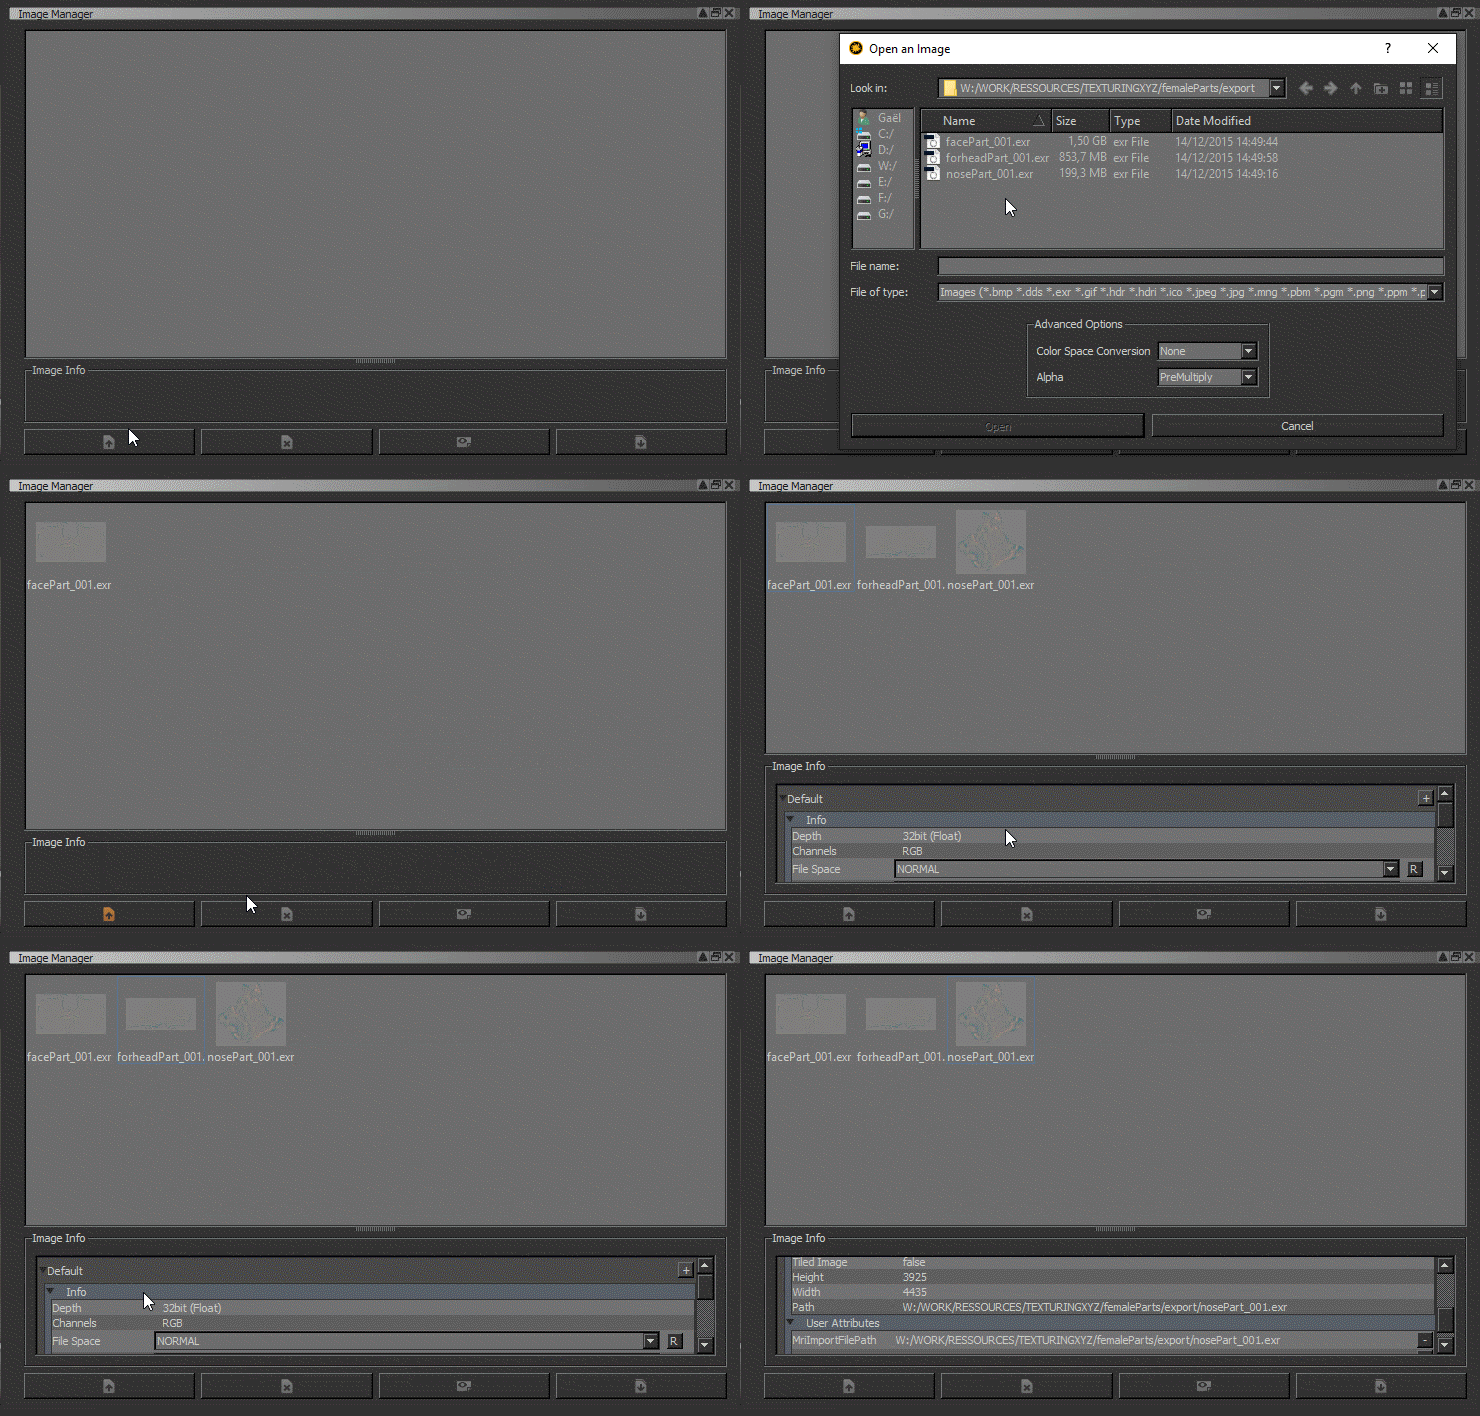
2. Be aware that you have to set up your Painting Settings. Go in the Painting palette, and set
up the Paint Buffer with the right values. I’m using a 32 bit Color Depth and a 4096 x 4096
Buffer Size.
3. Create the channel that you’ll use for your model. I start with 3 channels: secondary, tertiary
and micro. All of them are 8192 x 8192, with a color depth of 32 bits. Because I’m going to
show you how to use shared layer, we need all of those channel to share the same
attributes.

4. I’ll use the secondary channel as a base for all of my projection process. Start by painting the
part that you want on your model. Knowing that my texture files have been imported in my
Image Manager, I can choose them on the fly in my viewport by pressing the L shortcut.


5. When you are done with you projections I recommend you to rename your paintedlayer.
You should keep your channel hierarchy clear and readable. I’m using several folders. You
can also assign a color tag to all of your channel content. For example, my secondary
displacement will be coming from the Red channel of my projected layer. For this reason I
assigned a red tag.
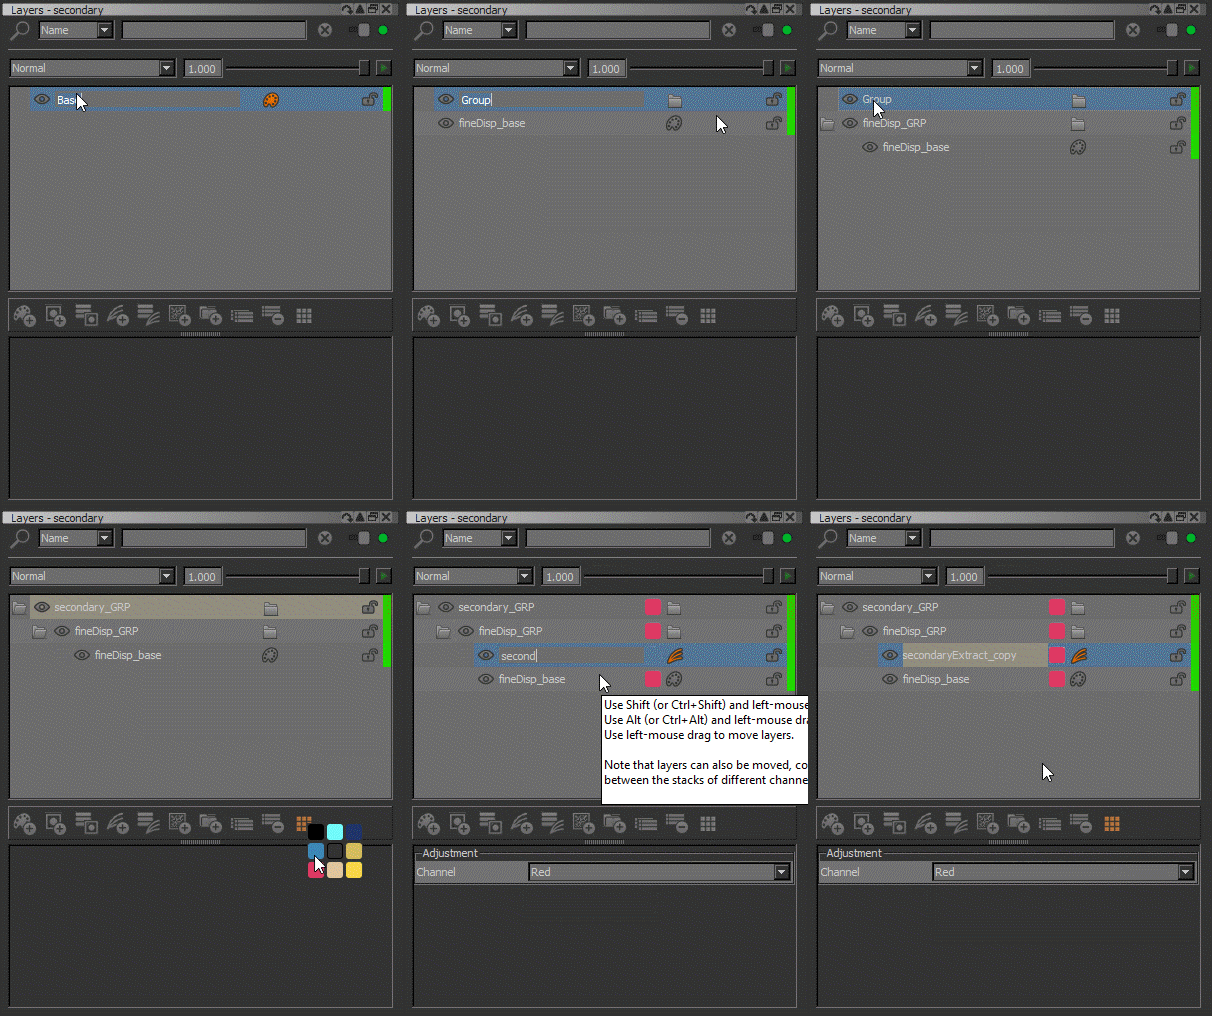
6. Create a Copy Channel Adjustment Layer that you will put on top of your painted layer.
Select the displacement layer that you want to export. If you followed all of the Nuke of
Photoshop Workflow, the Red channel will result in the secondary displacement extraction.
7. My painted Layer being composed of all of my secondary, tertiary and micro displacement, I
can easily share it with other channel in order to extract the color that I want. Just create a
new Copy Channel Layer in order to extract the displacement that you want.
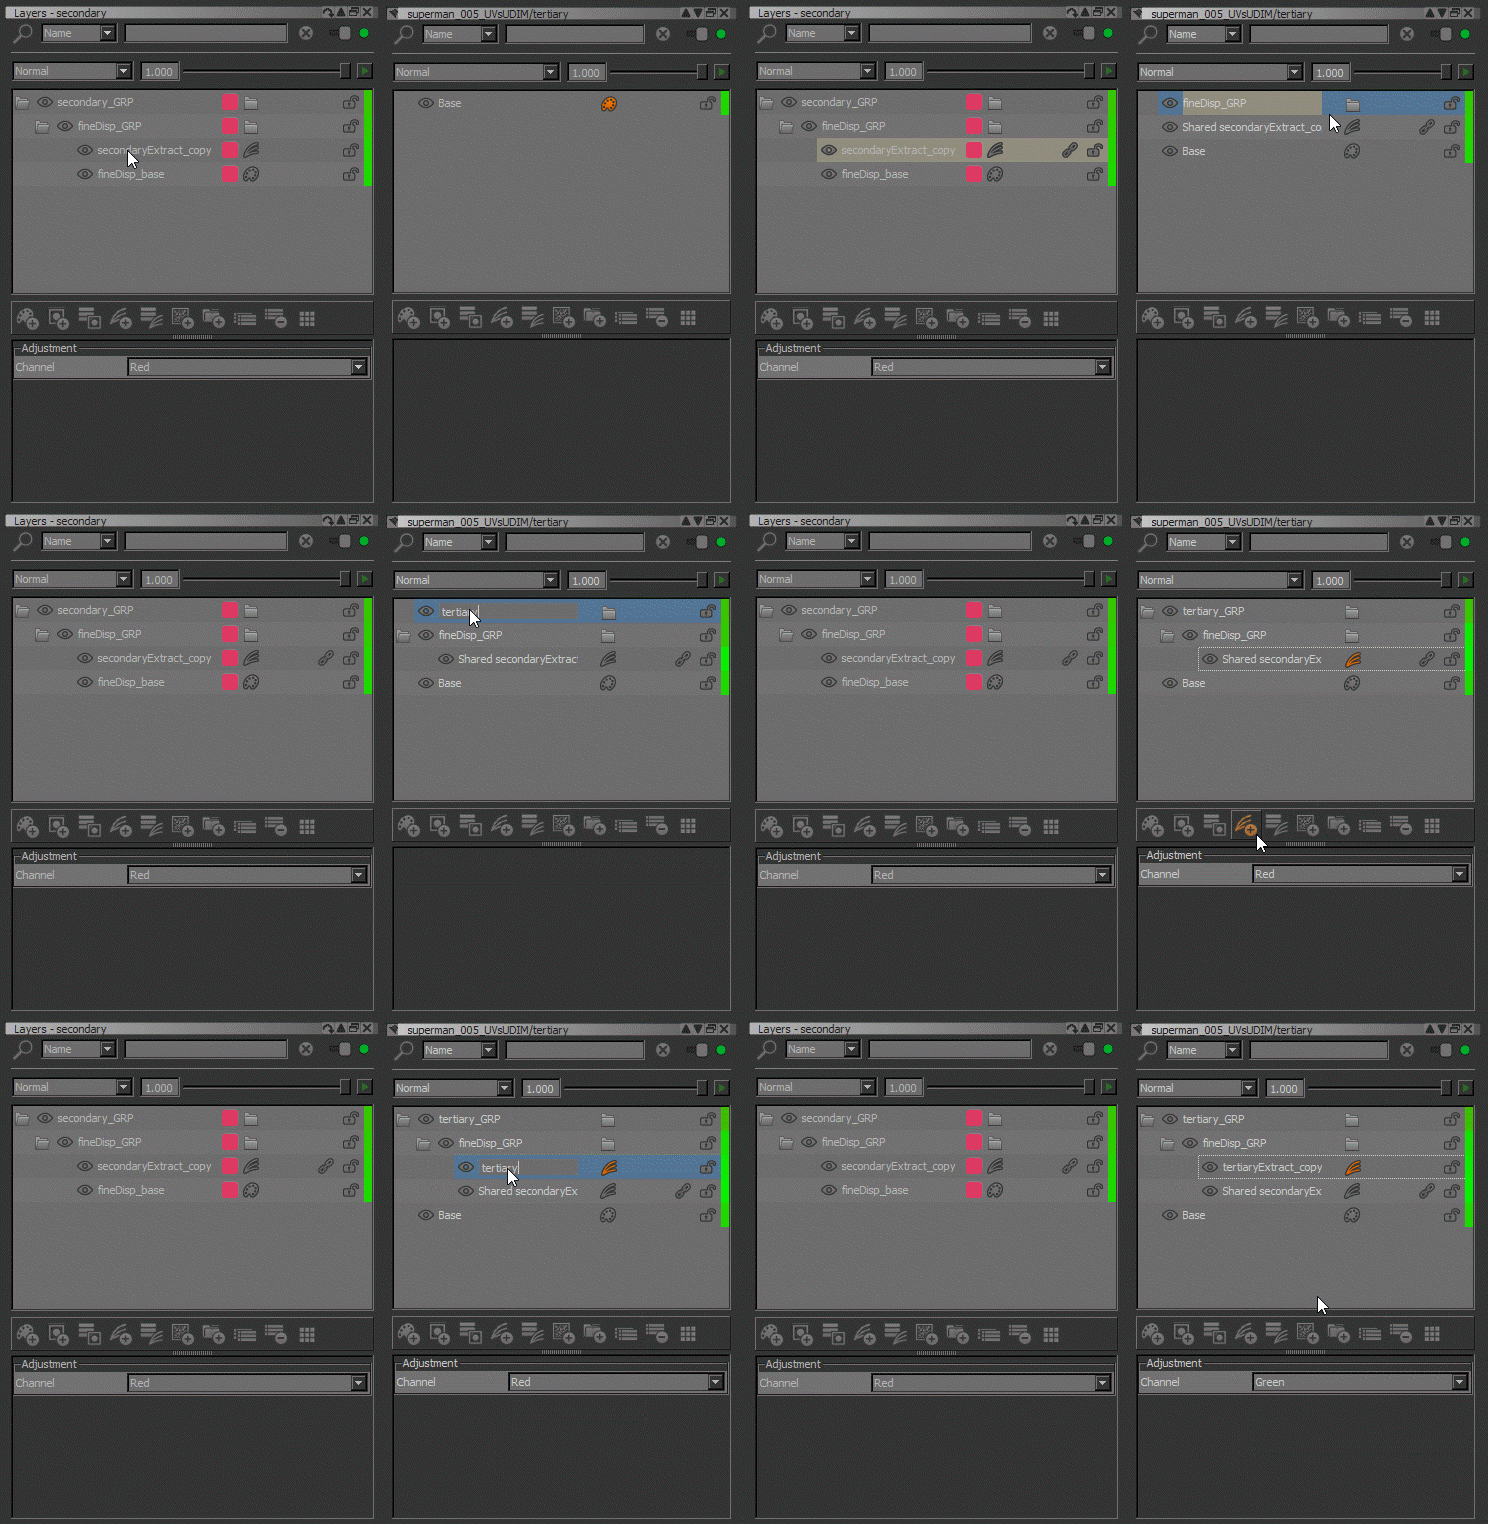
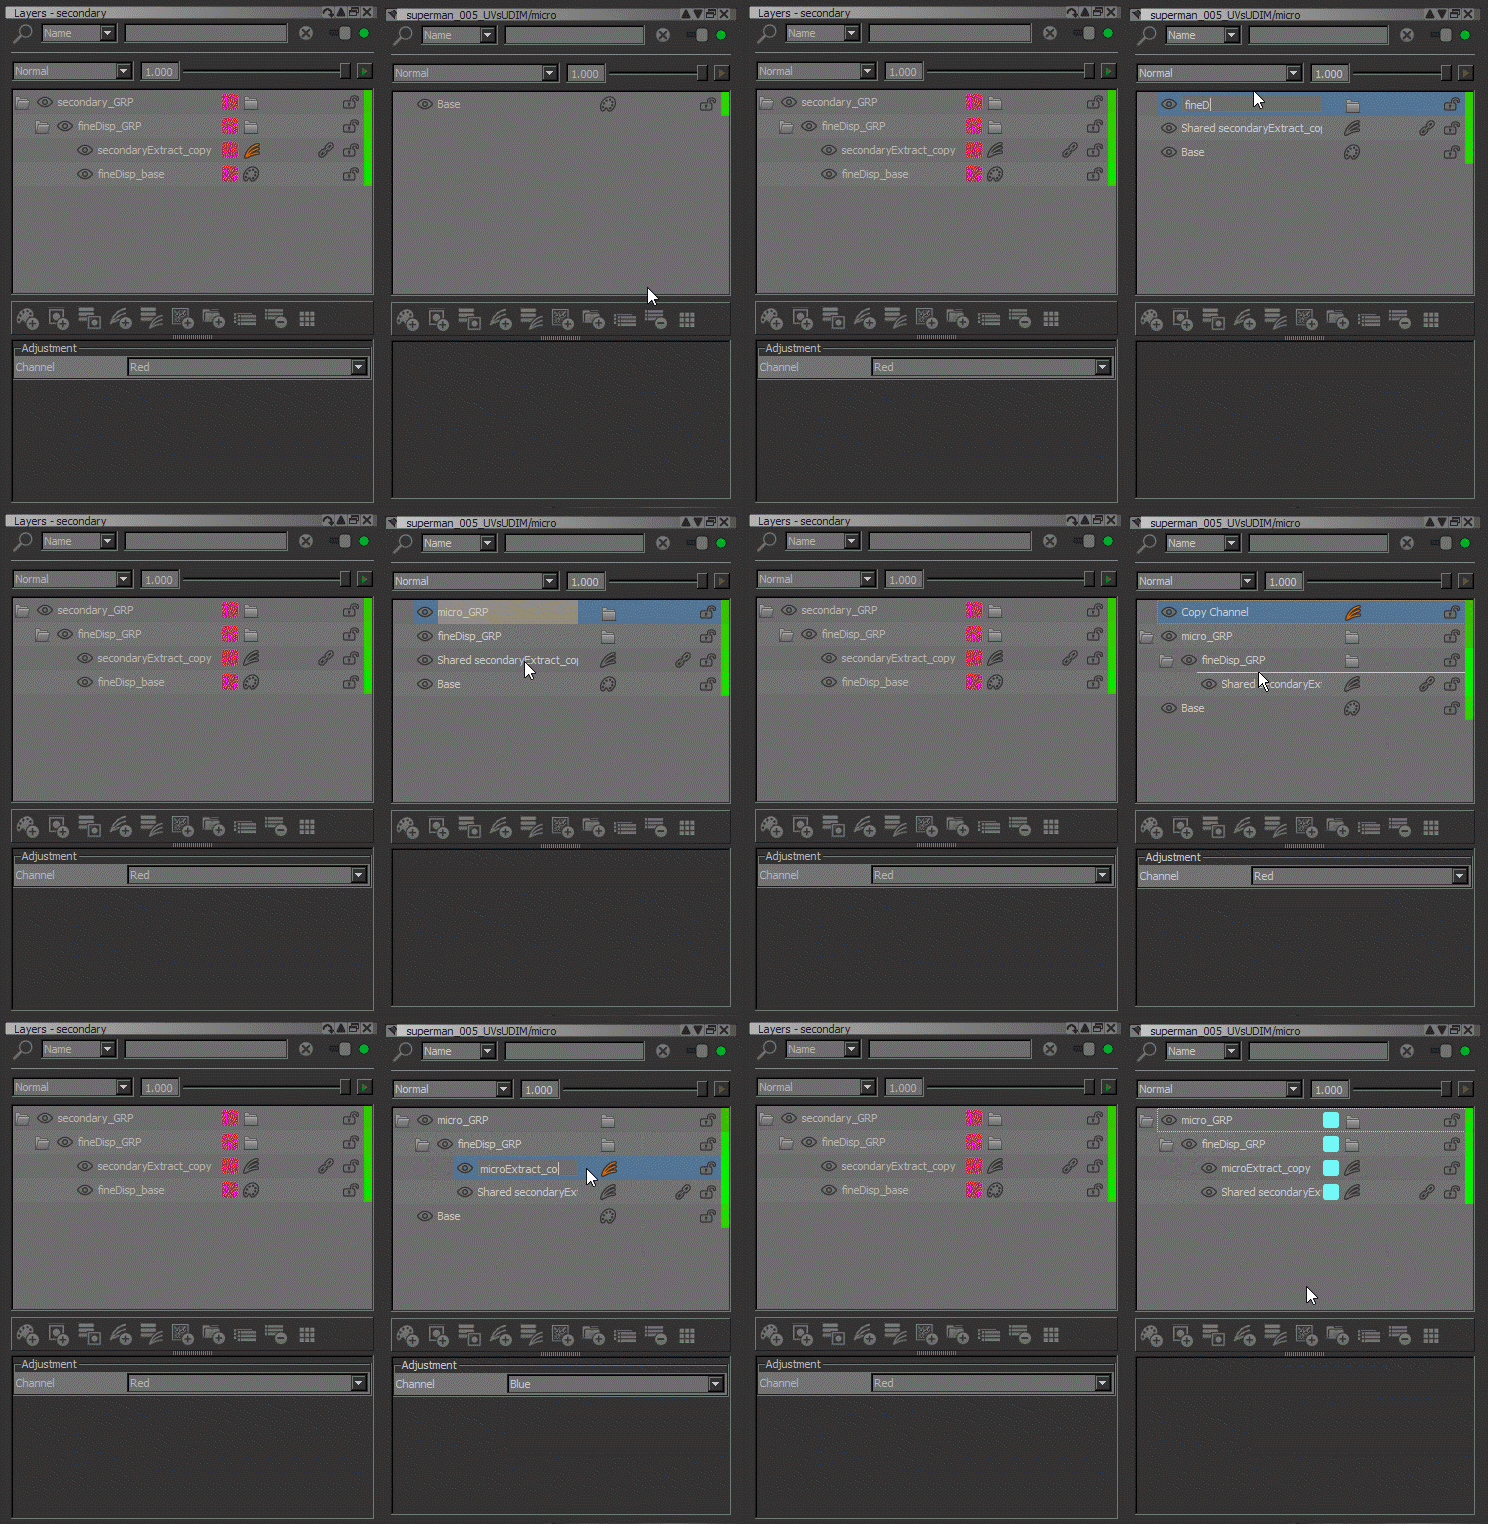
8. You might want to see how your projections are displacing the surface of your model. You
can create a new shader and put the channel that you want in its bump slot. Mari allows you
to display the displacement in real time. For example you can use the bump slot to select
your tertiary map and the displacement for the secondary. Just remember that the
tessellation is really hardware depending. You also have to refine the value of your shader in
order to get an accurate render in your viewport.

9. In order to adjust each of your displacement individually, you can create several Adjustment
Layers like Contrast, Brightness Lookup… You can also take advantage of Mari’s layer masks
to adjust only the area that you want.
10. The last step is to share the secondary, tertiary and micro displacement in one last channel.
I’m creating a new channel and name it fineDisp. Then, I share all of my former channel’s
folders in the new one. The tertiary and micro have to be place on top of the secondary. Put
them in Overlay mode and adjust individually the value so you get the result that you want.
You can also put the fineDisp channel in the bump slot of your shader to get a great and real
time display.
The fineDisp channel gives you the final result of your displacement. You can now export it flattened
to use it in your favorite rendering package. It is also possible to export each channel individually if
you want to have more control on the result when you’ll work on the look development of your
model.

Model used and article written by Gaël Kerchenbaum


