


Simon Gomez / Making of Lily

Hello my name is Simon Gomez. I’m working for the VFX industry, focusing on texturing, lookdev and lighting.
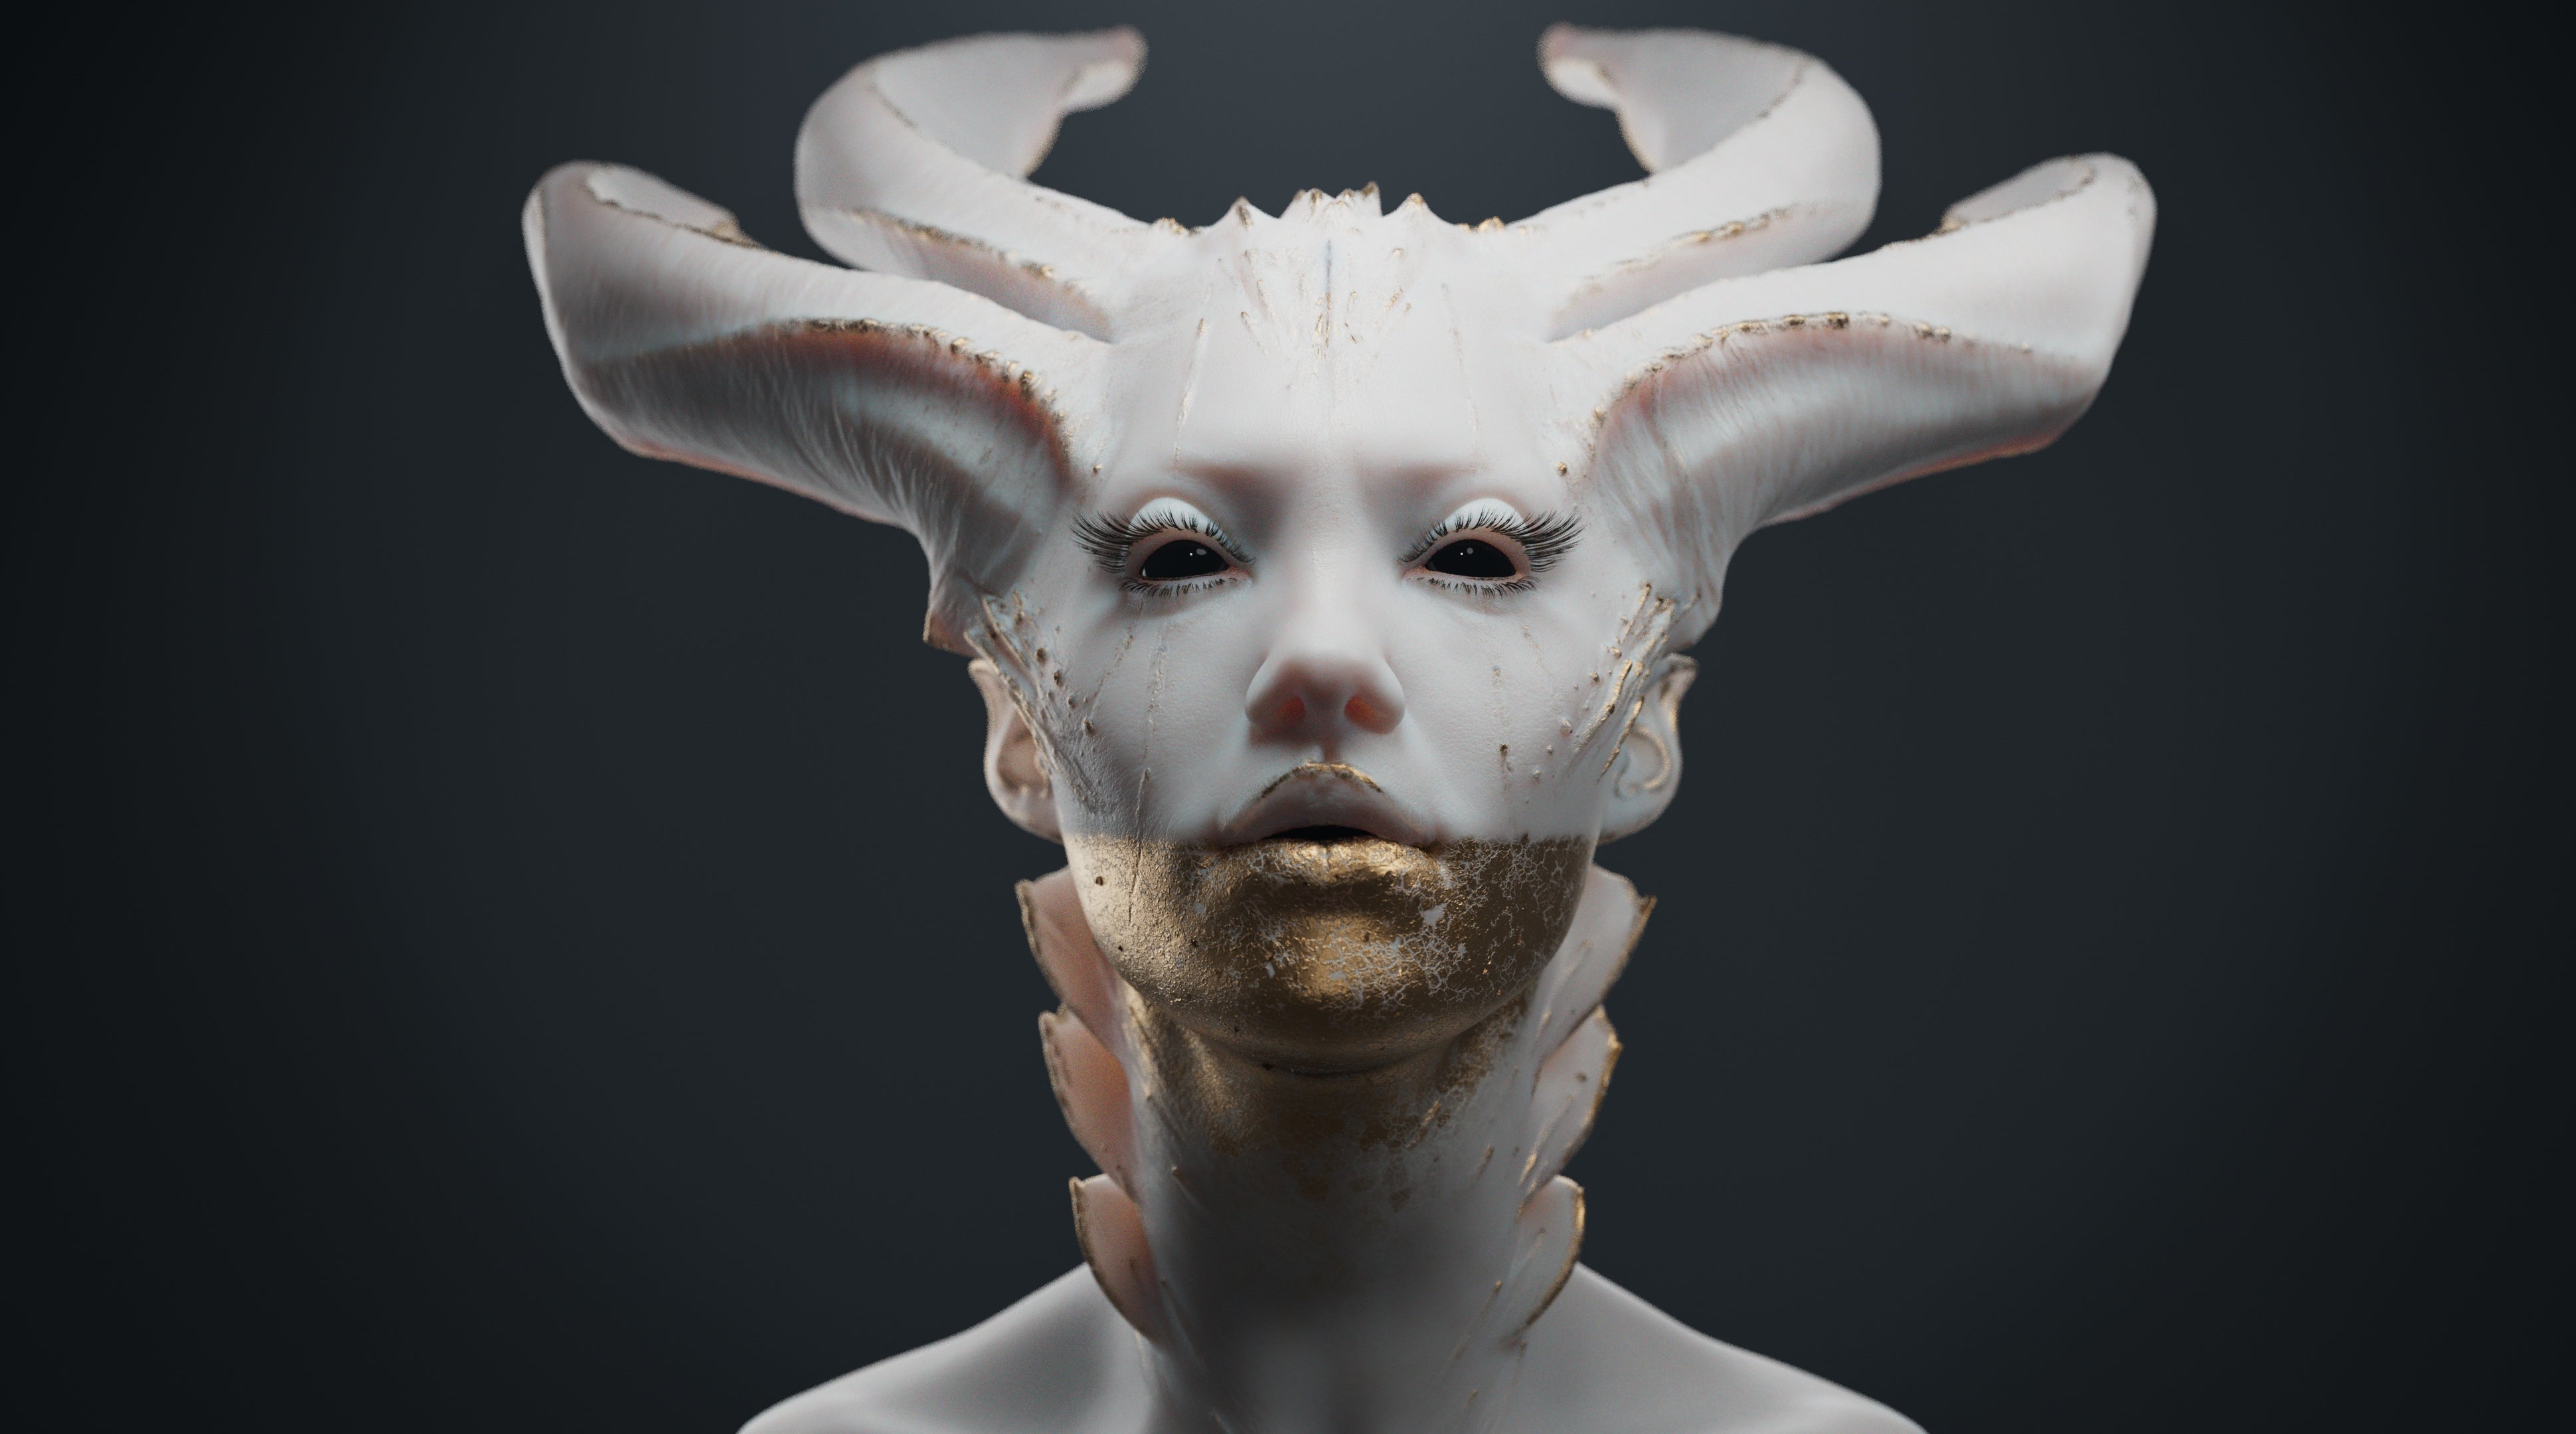
I have passion for creating believable textures and materials and I’m going to show you my workflow on my personal project « Lily », on a beautiful mesh from Niyazi Selimoglu.
When it comes to texture photo real faces, texturingXYZ is an extremely powerful tool. It allows you to do fine skin pores and add all the different types of wrinkles of a face without doing it by hand and with an extreme precision.
On This project, I only needed the XYZ Multi-Channel Faces displacement map due to the art direction I chose.
In this article, we’ll see how I used XYZ displacement maps, and we’ll focus on how I created a stylised face.
Always start with references from the real life and more

I always take some times before starting a project to collect some references, to know where I will be going in terms of Art direction. But It’s also crucial to find textures and materials references to create something believable.
ACES CG
For my personal projects, I like to use ACES color space.
I won’t explain what ACES is in this tutorial, it will take too much time, and some other guys will do it better than me.
I invite you to watch the video from Peter Aversten who explain in depth, the ACES workflow in Mari :
And of course the chapter on ACES color space from Chris Brejon lighting bible.
First, I have setted up the ACES transform in Mari and Maya.

Go to your project settings to set up the ACES color space, and select the “config.ocio” file from the version you want. You have to select the exact same version of this file, in the preference and colorspace tab in Maya.
Once we are ready with ACES, let’s start painting !
DISPLACEMENT

MARI
I imported the XYZ displacement map from Female 30s Multichannel Face #25 just with a drag and drop. Don’t forget to select the right color space of your map, in the image manager, to have the correct interpretation. Then I projected this map in a 8K channel, 32bits, using the paint trough brush.
Make sure the color space of your channel is in raw to get the right colors of your displacement map, without applying the ACES transform. And don’t forget to check the size and the depth of your paint buffer.
While I’m painting, I like to change from flat (F2) to basic (F3), to really see if my projection matches the model volumes and to avoid blurry areas from brush strokes. And if your mesh is not too high poly, displaying the wireframe (shift + W) can be useful to have a landmark on top of your paint. You can also start with an empty layer and stamp your image on your UVs, bake it down and just do some « paint fix » on certain areas.
When I was happy with my painting, I exported my displacement map in 8k, 32 bits exr.
ZBRUSH

In Zbrush, I used the “Multi Map Exporter” to export different maps at the same time, such as Displacement and Normal map to generate a good cavity/curvature in nuke.
I generated those maps from the level 3 of subdiv because I’m using the level 3 of subdivisions as a base mesh in Maya to have a better result with more accuracy due to the number of polygons.
Here, I also exported the displacement in 32bits .exr with a middle value setted to 0.
TIPS : for creating a clean cavity/curvature in nuke using the normal map from Zbrush.
Sometimes it can be very useful to have cavity and curvature maps in mari. For example, when you have high frequency details from the sculpt that you want to strengthen, like in the albedo channel.
You just have to import your normal map in Nuke, and create three “shuffle” nodes. Isolate red, green and blue channels with those three “shuffles”. And add an “emboss” node, then play with the angle rotation and the width if you want larger details. Merge everything in overlay mode, grade it like you want and that’s done !
MAYA

Then I brought all my displacement maps in the hypershade of Maya (in Utility - Raw, color space), the one from Mari, Zbrush and the other one for the gold. The value of my displacement height was setted to 1 and the middle to 0 because it was with those settings that I exported my displacement map from Zbrush.
I blended them using a “plus minus average” node by creating “new items” in the “Input 3D” tab.
The multichannel displacement allows you to control the amount of different frequencies from skin volumes to pores : R + G + B. You just need to plug the different channels into the “color 1” slot from three different “blendColors” nodes. Set the “color 2” slots in black and just play with the “blender” slider to control the amount of each. I usually test them one by one, to be more precise and to control what I’m doing.

I always test my displacement with a basic lighting and just a simple gray shader with a bit of reflections.
When I was happy with all my displacement, I started to paint albedo channel in Mari, mostly composed by procedural nodes, and directly in maya hypershade with masks I created.
CREATING THE ALBEDO
All the blue different shades were made with black and white masks between two color constant nodes, a dark blue and a brighter one. I always like to use procedural nodes to quickly generate a solid base, and after that I can do some refine painting. This kind of technique allows you to create some “happy accidents” and random breakups that you can get inspiration from, and then strengthen with brush paint.
TIPS: When you are texturing, make sure to always paint high and low frequency details, to have something more and interesting from different angles (far to close-up). Use procedurals nodes to create a quick base, but always use breakups maps for a more natural result and less systematic.

As I said, I collected a lot of references before starting. This is the type of organic maps I used to add some natural breakups with nice variation on the skin. I also used some marble images as black and white tiled masks.

An example of how you can use the paint through brush with interesting maps, in luminance mode. It will reveal your paint, only through the brighter colors.
SHADING

As you can see I did the gold part in the hypershade of maya, driven by masks.
For my personal projects, I like to do a lot of “texturing” directly in the hypershade to keep something flexible until the end.
So, I did these masks in Mari, as a base for the gold part (don’t forget to manage your masks channels in raw to not transform them with the ACES color space.).

Then I brought all the different masks that I painted in mari, into maya and I blended them with some procedural nodes, such as aiCurvature, aiCellNoise and tileable maps...
I really like to use the aiCurvature, this is a powerful node that you can use in two different modes : convex and concave, with red and green outputs. When you are using curvatures, always break it up by multiplying with a black and white noise or tileable maps to make the result more natural, realistic and less automatic and procedural.
And my gold mask turned like this. I just added some little pieces of geometry to make it more interesting.
After this point, I simply plugged my albedo map into my aiStandardSurface, setted my SSS (randomwalk_v2) radius color and scale, my bump and roughness with all my different masks. I also tiled a micro skin face map into the bump channel to have more high frequency details and a better resolution in close up.
LIGHTING
"For the lighting I wanted to do something stylized and with a light source who comes from the top to give a sacred aspect to my image."
As you can see, I used a few light blockers to have more control on my lighting. It allowed me to sculpt face volumes with lights without illuminating the part that I wanted to keep dark. I added some back lights to accentuate the sub-surface scattering, this is something that always works.
I created two disks lights, linked to the eyeballs, just to create some nice spec shapes to give her a better gaze direction.
TIPS : If you have a good computer, you can use the viewport raytrace of Arnold, to fasten your workflow while you are lighting.
Then I did a bit of comp in nuke. I did some color corrections, like adjusting contrast, saturation and added some particles, ect. I also did the depth of field and added some grain and chromatic aberration. But I always try to have the best result directly out of maya.

Thank you texturing XYZ for the maps who allow artists to work faster and with an extreme precision detailing skin pore and wrinkles. And thank you for letting me explain my workflows on this project. Many thanks to Niyazi Selimoglu who gave me this really cool model to texture.
Thanks for reading.
Simon Gomez
https://www.instagram.com/limonsoc
https://www.artstation.com/simongomez
Niyazi
https://www.instagram.com/nyzslmgl
https://www.artstation.com/niyoo
| We would like to thank Simon for his helpful contribution. If you're also interested to be featured here on a topic that might interest the community, feel free to contact us! |