


Pietro Berto / Making of Emmanuel

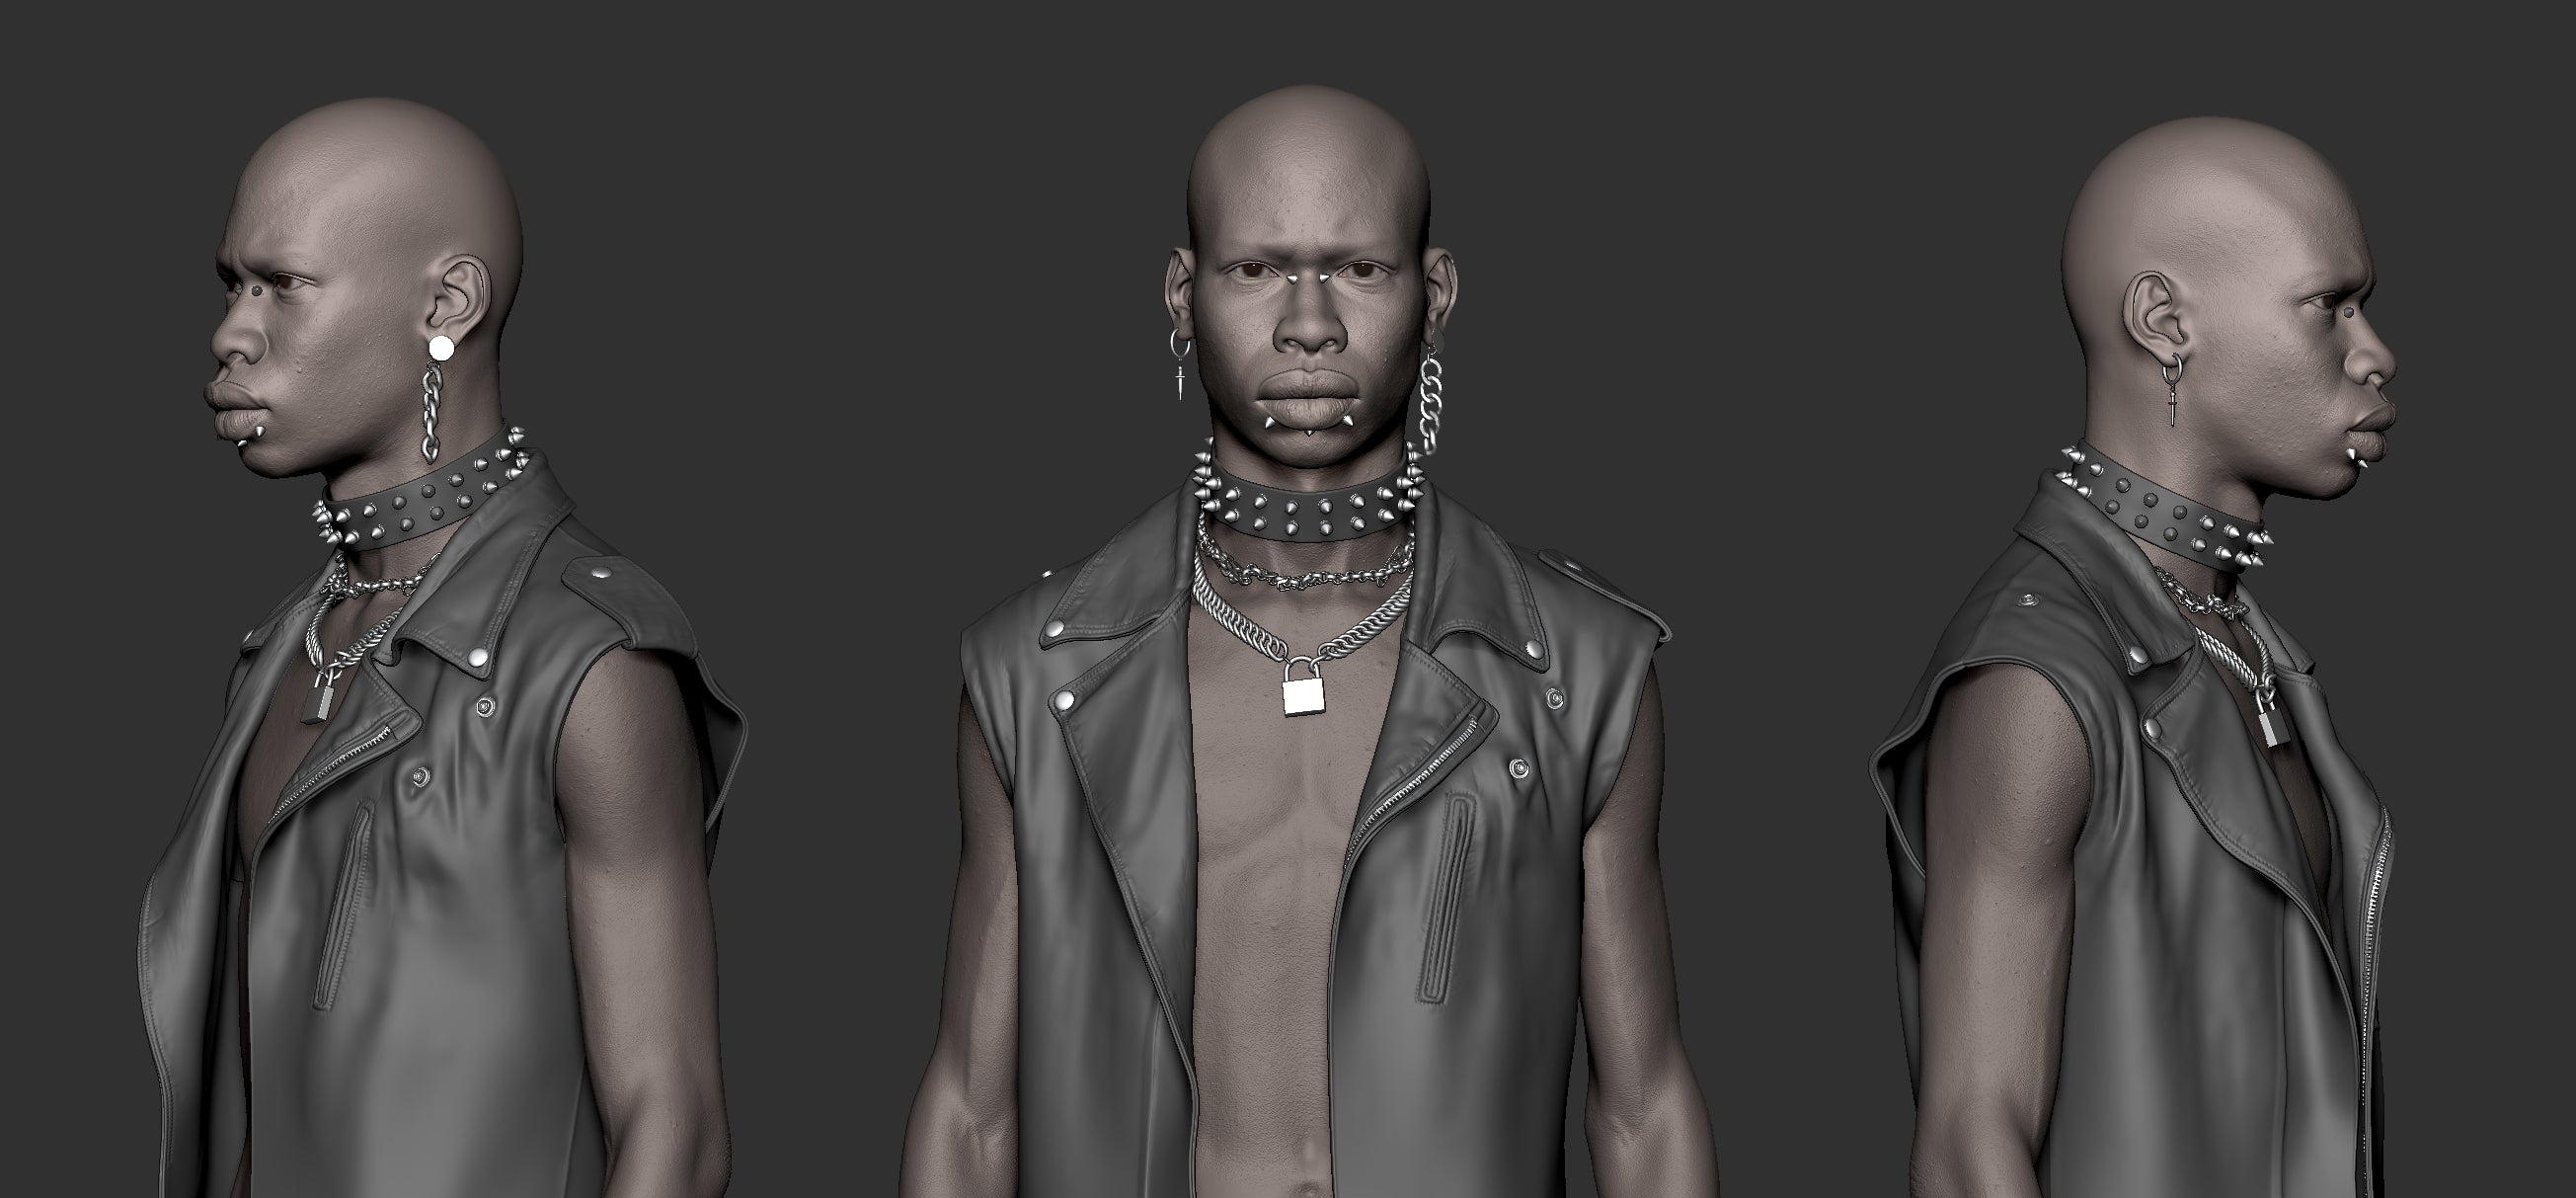
Hello, my name is Pietro Berto, I am a Character Artist working in the Game and VFX industry and I'd love to share with you the process behind "Emmanuel project".
It was some time during 2018, as every Sunday I was seeking art books in my favorite library, hoping to find the Holy Grail of all anatomy and art-related books; I found Emmanuel instead, on the cover of NATAAL magazine. I was immediately hit, had to take a picture, had to do something, and searched the guy all over the web. Collected as many photos of him as possible, and then... nothing, parked the project for about a year.
To balance professional and personal work is not an easy task, but I really wanted to sculpt him eventually.

Some time went by and I initially attempted a likeness, which I later twisted a little bit. It definitely took long to reach the final stages of this work, working on weekends, or at night after work, sometimes parking it for a month or 2, and then going back to it. When I started this project I mostly had a gaming background, and this required some learning, especially for Arnold which I haven’t used in a while.
The lockdown of this 2020, due to Covid, gave me the opportunity to finally push it to render stages, the number of works that the CG community published in this period has been just mind-blowing, and it is what pushed me to do better.

There are many artists that inspired me, such as Ian Spriggs, I literally listened to all of his talks while working on Emmanuel, it was great to learn from and listen to a person that literally breaths art.
Other artists that pushed me to do better, even if they would never know, were Peter Zoppi, Sekfi Ibrahim and his Silvina project, from whom I grabbed a couple of tricks! Kubisi, Marlon Nunez, Hadi Karimi, and I could easily mention a hundred more!
I also have the habit to listen to art podcasts whenever I get the chance. I must mention Jordu Shell podcast which is HILARIOUS, please give this man a medal!

Modeling

As I mentioned, I was initially determined to do a proper likeness, but it was starting to be very time consuming, therefore I decided to go my out route and sculpt my own interpretation of him.
My head basemesh is subdivided 6 times, about 12mil polys. For very small details it is not convenient, I’d go higher, but this way I was able to work quite smoothly with such a light mesh.
I used Multichannel displacement maps in Zbrush with zWrap as showed in this XYZ tutorial. A small tip would be to add divisions (no smoothing) to the plane before projecting it onto the head itself, to conform it as close as possible to the model, limiting the distance it will compute when transferring the maps. The projection might be distorted in some areas and some manual tweaking is often needed.
To sort this out, once the plane is projected onto the face, I store a morph target, and use the smooth brush to fix distortions. When I’m done I then use the “Project Morph” slider in the “Morph Target” tab to bring back the original shape. I tried to reproduce the process in this video
I then transferred the Disp map with Xnormal at 16k resolution, I did some further tweaks in Mari to reproject some areas I wasn’t happy with.. In Zbrush I then applied it to my model with the usual workflow: channel splitting. In my case I only used R and G channels, the mesh wasn’t dense enough to hold micro details.
I used Surface Noise as a first pass, and then masking by noise and inflating to achieve the final result. I also did a third pass to hand-sculpt some more details, such as the spots on his nose, some fine wrinkles, and fill some gaps here and there. For the lips, most of it was sculpted, but the XYZ disp map laid a nice guide I could follow.

 |
When it came to export maps these are my Zbrush settings, which produced an 8k 32bit displacement map |
| Once I applied my Displacement map in Maya I realized I wanted to extract more details, and I knew they were in there! I’ve seen some artists perform this technique in Nuke, but all I had was Photoshop so I tried something similar to split it. In Photoshop I duplicated the displacement map, applied gaussian blur + sharpen, and set the blending mode to Subtract. This way I was able to isolate a finer level of details and add them together in Maya, having the option to dial the intensity separately. This might not be the best way to do it, but I was happy with the result in this case. |
 |
When it came to the body skin details I pretty much used the same workflow combining XYZ Male Upper Chest and Male Belly maps.
Eye modeled and textured in Zbrush. Respectively: Sclera, Iris, pupil.


TEXTURING
I used 8k maps for all the objects in the scene: head/body/jacket
The skin was hand-painted in Zbrush. Doing a simple research I chose a color palette (actually 2!) of my liking and sampled some colors from inside the software, using a standard brush with spray mode on and a lot of playing with alphas. I ended up using the darkest values of the palette to respect his real features. This is a Zbrush screen grab of the base paint job.

Once exported the albedo map I then overlaid in Photoshop some height information onto it to enhance some features, such as small bumps and skin wrinkles/pores.
Spec and Coat maps: maybe these are the 2 most important maps of them all. In my workflow, I tend to keep them quite different from each other.
I used height details again to drive my spec and coat maps. Thanks to the software KNALD I was able to extract some utility maps, for example skin pores, skin cracks, curvature, and so on. Each one of these maps was very beneficial for the production of every other map in the skin shader.
SPEC: I used different layers of perlin noise as a base layer, added a bit of Ambient Occlusion computed with low scan distance, skin details on top, and finally some manual tweaks with Levels.

COAT: I wanted a more uniform and flatter effect for this map. I started with the same surface noise and used Knald to extract some smaller skin details, not really the pores, which were mostly treated in the spec map, but the cracks in between them.

LIGHTING/RENDERING
The whole process took place in Arnold for Maya. I imported a relatively high density head mesh for the final renders, since this started as a personal project I wanted to preserve 100% of the shapes, and also being able to adjust the displacement intensity without affecting the primary and secondary shapes too much.
 |
To start with, I did a Maya quick-rig to place bones and controllers onto the model. I only wanted to achieve a slight pose and this seemed like a good and quick option. I only had to adjust the skinning a bit, and it was good to go. I then stored a couple of poses with animation layers. |
It was now time to set up cameras. I used a 100mm lens for the bust shots and a 140mm lens for the closeups. In some renders I had depth of field active. I just placed a locator right onto the area I wanted on focus, and wrote down the distance from the active camera.
I used 2 different light rigs for the final shots. I never had much experience in lighting but I learned a ton by watching some videos by fStoppers. It is practical photography but can be applied very well to the CG world. Peter Hurley goes through many lighting setups, built exactly for portrait photography, pure gold! He also has many portraits on his website, which are a nice reference for this kind of work.
My setups:
- Main light rig: Rembrandt: HDR + soft Rim Light, light blockers, light linking, reflector. It gave me a harsh and interesting contrast. (The skydome has been scaled down in this picture just to show the environment lighting)
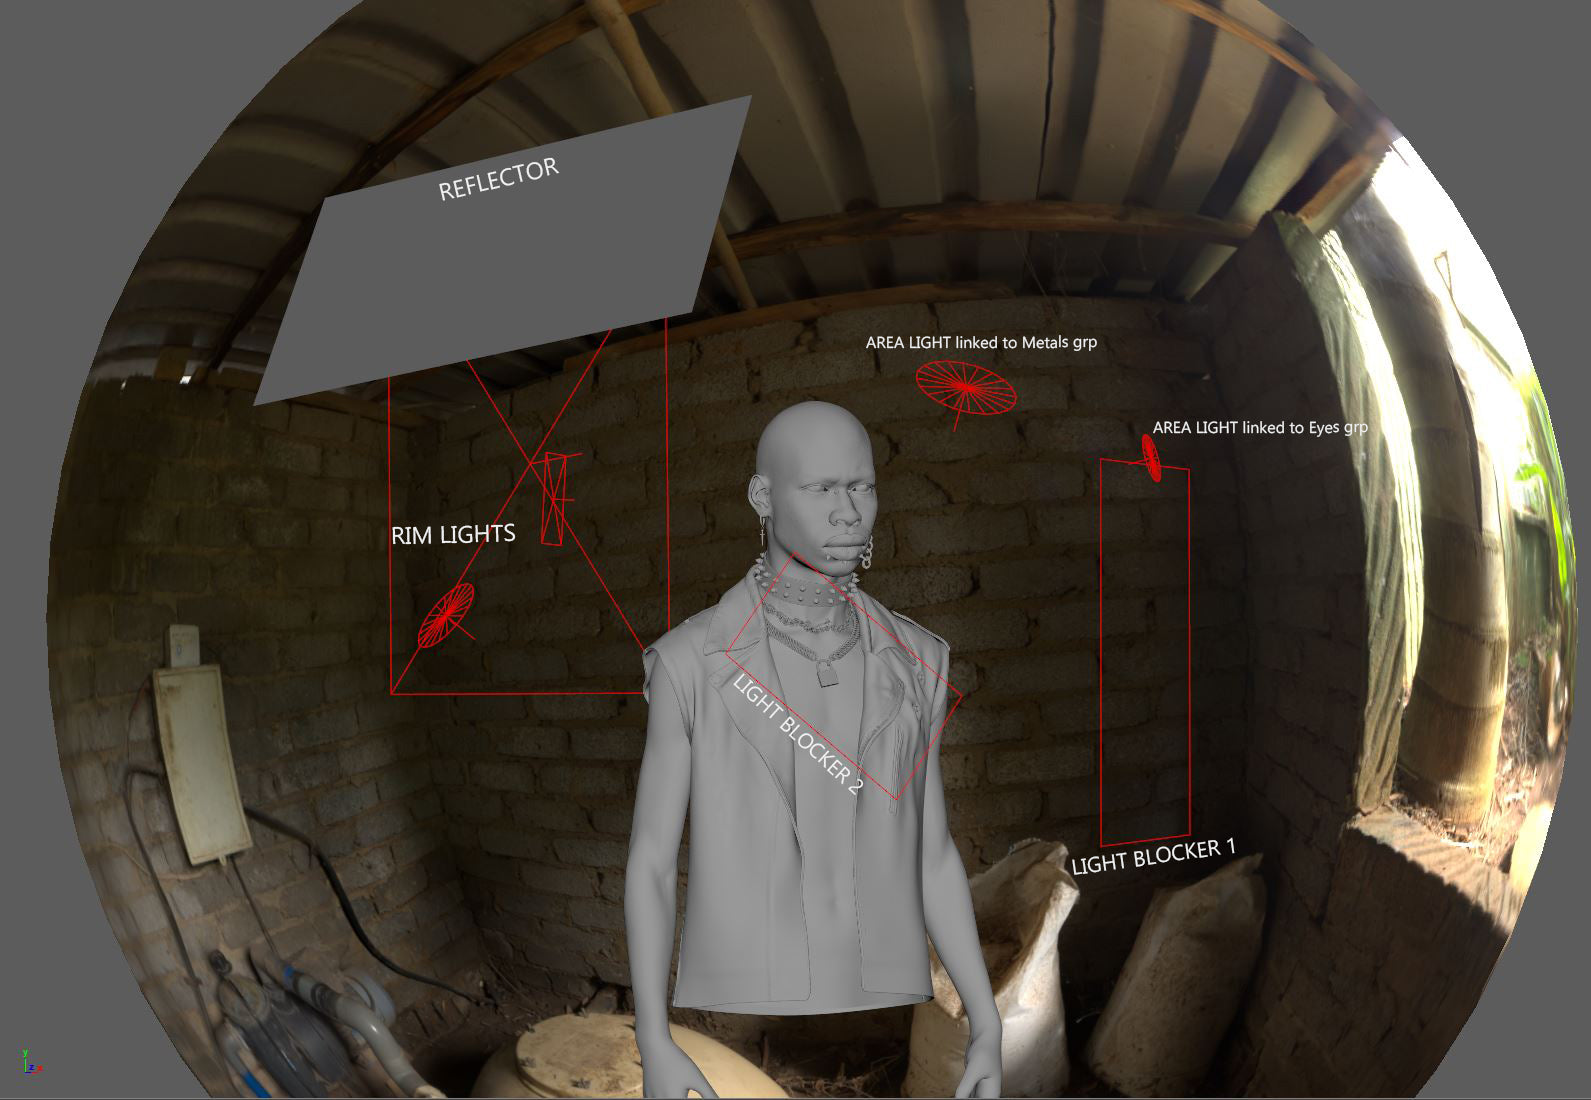
- I wanted to mimic Rembrandt lighting using the HDR from HDRI Heaven as the main light source, basically a very bright window. I thought for this kind of character some harsh shadowing might do the trick. But his right side was way too dark at this point, therefore I added an almost white reflector to bounce a bit of light, and some rim lights to have some nice backlight softly enhancing skin details on his right cheek.
I used a couple of light blockers to move some light away from the jacket and the body. There is a small circular Area Lights linked to the metals grp to give some highlights and a bit of shine.
Something I really want in a portrait like this is the reflection in the eyes. That is a must in my opinion. It wasn’t showing that much, so I cheated! I created another small circular area light linked to the eye group so that only his eyes were affected by it. A bit dangerous, but I kept it coming from the same direction as the main light. This way it’s not fighting too much with the rest of the lighting.
Rembrandt kind of lighting and a slight pose were key to give depth to the photo.
I wouldn’t use this setup for a woman’s portrait or for a beauty shot, but for a man (or a guy in this case) I love to give him harsher lights and shadows.
- Secondary rig: Butterfly lighting, flatter and softer, enhance cheeks. I added a top light to bring back some of the skin details.

I stepped away from the previous mainly natural lit environment and went for studio lighting instead. This is a much simpler setup, no HDRI, 2 main Area Lights crossing each other’s path before touching the subject and added a Top Light to bring back some of the dramatic effect I was looking for.

I cranked up exposure and levels here to show the difference between the 2 lightings more clearly. It is also beautiful to notice how the angle of the lights affects the perception of where he is looking. I didn’t touch the model in the 2 shots, it is the identical unchanged mesh, but in Setup 2 it seems like he is looking outside the frame, when in Setup 1 it seems like he is looking straight at the photographer.
It was great and refreshing to sculpt the model with light, to decide exactly where I wanted the shadows on his face and change his expression just by moving one light.
|
I wanted to be very cautious with the skin, when it comes to dark tones small changes make big differences and I had to be very gentle while tweaking my lights. You want a consistent light yes, but you can over expose the shot very easily. I used a grey ball and mirror ball all the way through the project to help me with the lighting process. I used light blockers (not in this shot), the strong light reflected by the jacket was stealing too much attention from his face, which I also brightened up through a reflective panel placed on his right side. Reflected light, instead of direct light, works very good on dark skin, as I learned reading Ava Berkofsky articles (Director of Photography for the Emmy Winning HBO Series “Insecure”). She pretty much is a breath of fresh air for the tv industry when it comes to shooting dark skin tones, she used some very interesting lighting techniques worth of learning. |
 |
 |
Reference images were vital during this process, I found some good ones on “Rawpixel” website. The main thing I noticed is how shiny some of the models look, and It is a beautiful look! The skin is the real subject. Of course, there is the hand of a master photoshopper too in these pictures, but I learned it is very common for actors and models to moisturize their skin before a shooting. I wanted to reach that level of “pop” straight out of my renders, without the need of going through a heavy post process. I let the shader do most of the heavy lifting, I achieved the result I wanted by an intense specularity and the right IOR, breaking it all up with the skin details coming from the displacement maps made the trick. |

In my Arnold skin shader (a simple aiStandardSurface) I used nodes such as aiColorCorrect and aiRange to tweak the maps till a nice result was obtained. My shader network is pretty simple, I try to keep it as less technical as possible. For the head, I used a Layered Material to mix the skin and the makeup.

BUMP/ROUGHNESS MAP: I previously mentioned I didn’t use the “B” channel of my RGB displacement map, things change at this point. I plugged a tiling micro skin map into my bump slot to serve 2 purposes: micro details and specular roughness. That’s why I don’t use a roughness map in my shader Specular tab.
What I did was to paint a mask in Zbrush to dial the intensity of its details. Darker areas will result in less details intensity = less rough, brighter areas will instead result in more depth of the same details = rougher surface.

And finally, this is how I plugged in my displacement maps, it is a very basic setup. I have 2 levels of displacement at this point, a broader one and a much finer one obtained with the technique explained before. Each one of the maps is plugged into an aiRange node, so I can adjust the intensity through the “Output Max” slot, and then I add them together through a “plusMinusAverage” node.

And this is the result of such network. Primary Disp at 0,75 Intensity, secondary Disp at 2

HAIR

 |
The hair were done using xGen interactive, nothing special, very few modifiers and a bit of manual sculpt. This is how I grouped my grooms. |
| I used aiStandardHair shader with the “black” preset and only very minor tweaks. I did increase “Extra Depth” and “Extra Samples” in the Advanced menu though. | 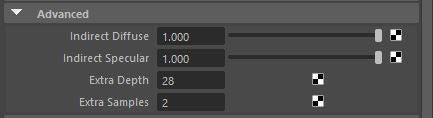
|

POST

I was still unhappy, the jacket and the body were receiving more light than the face, so I made sure that it was finally fixed. So I did a little post work on my renders. I exported the final render at 32bit EXR format, this gave me some room for exposure correction to further drive the attention where I wanted. I then applied a light grain to the final picture.

CONCLUSION
I started the rendering process using Arnold GPU which is way faster but some Maya nodes are not supported yet (not a big deal). Unfortunately, I ran out of memory halfway through the project (I have an Nvidia 2080 8gb RAM) and had to switch to CPU rendering instead (an ugly 6 cores 12 threads intel i7). Being used to realtime characters this was a bit of a pain, but I loved the process to bring something like this to life, definitely gonna attempt it again!

The highlight of this project was for me to receive appreciation from the 3d artists I always admired and from many other people (not only artists!) I came in contact with after I posted it on social media. I owe the success of this piece to the CG community Thank you!
And thank you XYZ for your hard work!
RESOURCES
Where to find me

| We would like to thank Pietro for his helpful contribution. If you're also interested to be featured here on a topic that might interest the community, feel free to contact us! |