


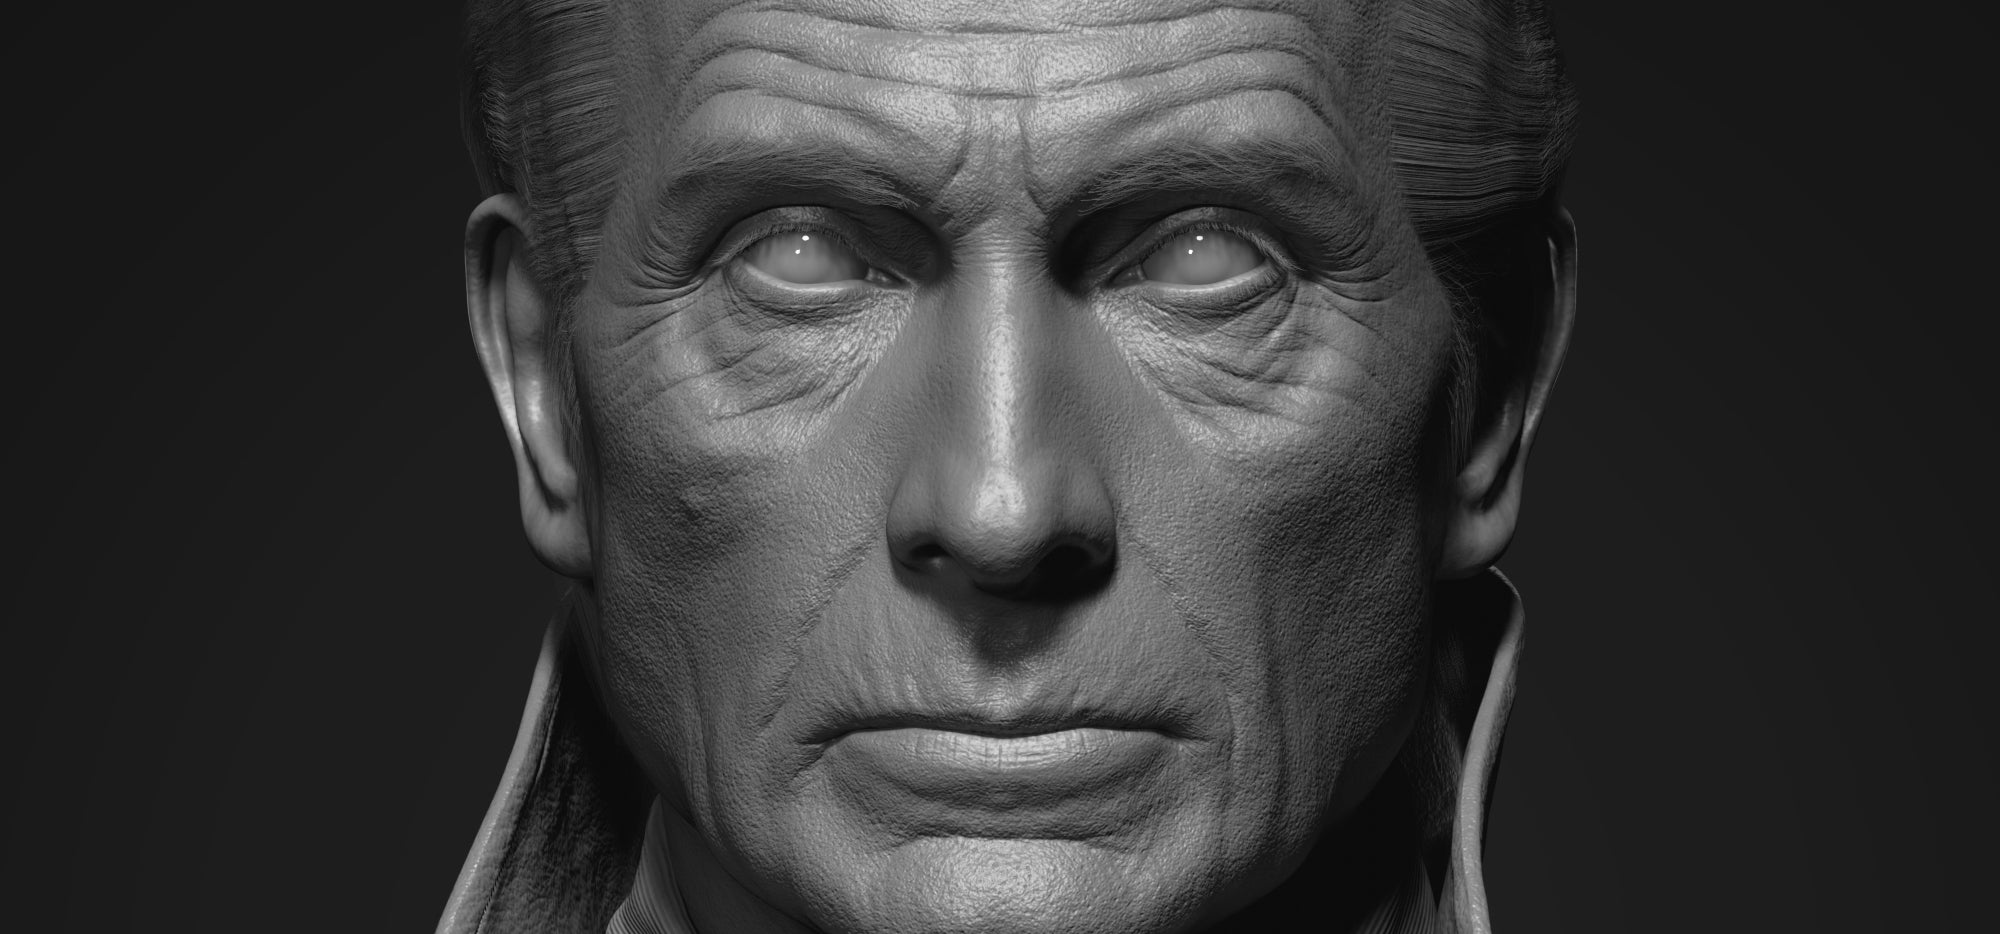
Making of "Viktor"

Hello, my name is AoBo Li. I have a passion for sculpting, films, and Art in general which usually give me a lot of inspiration. I'm going to breakdown the work I've done for one of my favorite film's characters.
I do like the workflow revolution brought by TexturingXYZ. In my previous works, I used a large number of alphas and textures materials to overlap, adjust, project, etc. which made the process quite complex and tedious, but also the final results I got were not real enough so far. For instance, it was difficult to precisely control the texture changes overall different facial areas, especially the border areas where the texture changes to another pattern.
Resulting in a blurred or relatively messy micro skin structure with overlapping or layer stacking. While this will look okay-ish when seeing in a relatively long distance this won't be great in a closeup shot. Quite a lot of flaws will be observed.

It has always been a concern that scan data or AI will replace manual work in a situation where realism or hyperrealism is needed. In my opinion, there is no need to worry about this for now. We can’t give up the challenge just because worrying that it might happen in the future. At least, it hasn’t happened yet.
TexturingXYZ materials have brought great possibilities for high-resolution character and creature works. I believe there are still a lot of spaces for the Artists to explore.
A good workflow is very important. Artists should spend more time on creating and focusing their energy on the quality of what they are producing.
"The time spent on repetitive tasks must be reduced."
Modeling
A (very)good model is essential for all of the subsequent work, which is very important.
In my workflow, I work the 3D model and the displacement mapping simultaneously, going back and forth from Zbrush to Mari, and so on until I got the desired result. I think both are complementary and should be considered as a whole thing. I worked on the primary forms, anatomy, and likeness in Zbrush.
Then I used Mari to project the TexturingXYZ map, after that, I come back to Zbrush where I turn on the displacement 'displaying' and continue to sculpt the details accordingly with the textures from Mari. Depending on the situation and the result I obtain, I could repeat these two tasks until I'm happy with the result. In this particular process, we should be patient, focused, and dedicated.
- Mari
The goal in Mari is to have the TexturingXYZ map details laid down on the model as complete as possible. All the details will be visible in the render. Therefore, it is required to avoid stretching and blurring. The transitions of different textures should be carefully handled. Besides, the proportions of the textures should be well controlled because the result will be more realistic with more realistic proportions. You can use a micro map as the base for the Tiled layer and fill in the part that might be left out and empty.
First, we need to copy/paste the secondary, tertiary, and micro-detail maps into the red, green and blue channels respectively in Photoshop, and crop it into three maps, forehead, nose, and face. Then export everything for Mari.

In Mari, I created an 8K map, 16bit color, and 8K Paint Buffer size.
For this project, I used Male Face 40s FullFace #04, Female Face 60s FullFace #02, Neck #01, and this Micro Skin pack with 30 tileable maps.

I draw auxiliary lines also known as flow lines or strength lines before starting the project, which helped me to precisely determine features such as wrinkles, nose, eye bags etc. of the model. This is very useful and handy.

I did the first projection pass in the UV space. Using the Stamp tool, Paint through, Slerp, Pinup tools mainly The auxiliary lines play a big part in this process, following as much as possible the wrinkles and features of the face.

Local adjustments and seams work are then carried out, which can be fixed using layer masks.
Throughout the projection process, I try to work super efficiently and reduce the number of repeated projections.
A good layer management will help to get the work done smoothly. Keep it simple.

"When you encounter parts of the model that are occluded, you can import multiple versions of the model."


Exported from Mari at 8K resolution.

- Zbrush:
First, import textures from Mari.

Sculpt the details and reinforce structures.

About the use of XYZmap from Mari:
1. The simplest way is to Apply DispMap.
2. Mask and Inflate
3. Use Morph Target to modify the details
This time I choose the Mask and Inflate. The Mask and Inflate is a relatively complex thing, it does squeeze and inflate the pores at the same time, which is more vivid than the effect presented by only Applying the DispMap.

Inflate intensity remains the same, but the squeezing effect is more pronounced by repeating the same operation multiple times.

However, meanwhile, this method will also make the whole model expand, like a balloon. Therefore, the value should be carefully tweaked. In some cases where the details are overly small, we can use a layer or morph brush to adjust the effect.
Zbrush layer arrangement:
- XYZ Secondary
- XYZ Tertiary
-
Additional details (sculpt over)

Use the Morph tool to modify the details. It is possible to edit only the content of the layer, without breaking the primary forms or any other frequency.

My model has about 11 800 000 polys. Considering the performance cost in Zbrush, I haven't increased the polycount to add more skin details. Instead, I used some tileable textures directly in Blender.

- Normal Map:
Using Zbrush for the baking process:
- Use the Level-2 model to bake
- Use the Level-3 model to export to render
This way, we can nearly completely restore the previewing result in Zbrush. In this process, the lower the model level for the baking process, the higher the intensity of the normal map is gonna be, and vice versa. It nearly took no time to wait for the baking of the normal map in Zbrush, which saved me quite a lot of time. Meanwhile, it also cost little time on the data importing and exporting.

Blender Cycles & Eevee
- Cycles and Eevee:
Cycles is Blender’s physically-based path tracer for production. Eevee is Blender’s realtime render engine. I like doing things quickly with an easy workflow, I've done almost all the shader work, nodal setup and base lighting in Eevee. Finally, in Cycles, mainly tweaked the hair shader, SSS shader, and lighting, in other words, polishing things that Eevee wasn't able to produce. The whole process was very comfortable, seamless & straightforward.
- Eevee:
I'm going to do most of the work in Eevee, and to get a good preview of the results, first I'm going to do some settings on Eevee.
- Sampling: As more samples are taken, the solution becomes less noisy.
- Turn on AO
- Turn on Screen Space Reflections
- Shadows: I let Size not less than 1K.(Cascade Size only for Sun lights)
Turn on High Bitdepth and Soft Shadows.

Then I created a sunlight, area light, and rim light.
- Turn on Contact Shadows
- Sun Angle & Area Size:Higher the value, the more the shadow will be blurred.

- Skin Shader:
To me, this relies mostly on the displacement, bump, normal information, the relief plays a BIG part in the skin shader. I increased the details for the skin by mixing some tileable textures from TexturingXYZ, which allows the skin to have some great details when observed from any point of view. The micro skin library from TexturingXYZ is complete, covering the full-body, offering a wide range of various patterns to choose from and experiment with. I can freely control various kinds of attributes such as their visibility (position) and their intensity driven by masks. Also, when they are applied in game projects, they are very practical and powerful.
Firstly, I mixed the normal map and the displacement map. At this stage, I used two packs of tileable micro skin to add pores and micro details. And it turned out to be not bad at all.


Tiled maps can be powerful when the Zbrush exported model and maps don't have enough details.

This setup can also be used in a real-time render, to avoid memory consumption. When I have to switch to a real-time rendering, the things I have to do are only tweaking the lighting and a bit the shaders. Nothing else.


I added these tileable textures, which have been already set, on other components such as the color, the specular, and the roughness. Controlling everything at the same time enable the details to pop and bring a new dimension to the skin shader.

The base color map and tiled maps are mixed in skin shader. This time the character's skin was clean, so I didn't work that much on the Base color, just painted eye makeup and enhanced wrinkles in Photoshop, the rest was done in the shader.
- Lighting & Rendering in Cycles:
During the whole process of lookdev, I constantly changed the lighting and environment, to make sure that everything can work in any lighting conditions. Here I used Blender's preset HDR lighting, it contains several typical lightings that I can switch with a single click, very convenient and easy.


When all the prep work is done well, your character will present wonderful results in any environment. I don't like to cheat with a lot of light, and I want the digital characters I created to be up for any light or shadow challenges. So I just used a rim light and HDR lighting for this project and I was pretty happy with the results I got so far.
Cycles render settings:

Cycles render settings:
- Sampling Render: A quality option that allows getting for each pixel the accuracy of it, from the shader, lights and textures, rays are sent from the camera to every data of the 3D scene. Higher the value you'll put here, cleaner will be the final output. But it will also take more time, depending on your machine specs.
- Sampling Viewport: Number of samples for viewport rendering.
- Transparent:Render the background transparent
- Transparent Glass:Render transmissive surfaces as transparent

Cycles is very simple to set up and use, and extremely comfortable to work with.
I adjusted the color temperature in Photoshop to make the picture look cooler.

In the end, I want to thank TexturingXYZ for the great revolution they brought to this industry. And I also appreciate this opportunity to share my work experience with you.
Thanks for your reading -AoBo Li
Artstation : https://www.artstation.com/liaobo
Instagram : https://www.instagram.com/aoboli_ins/
| We would like to thank Aobo Li for his helpful contribution. If you're also interested to be featured here on a topic that might interest the community, feel free to contact us! |