


Making of “Elephorse” : Pushing your Creature workflow

My name is Nicolas Morel, working in the VFX industry as Creature modeler.
In this making of I will speak about how I approached the creation of the Elephorse and how the Animal texture packs from Texturing XYZ helped me to push my texturing workflow further.
I will explain some of the techniques I used during my creative process that respect my motto : Keep it Flexible ! And how texturing XYZ helped me to achieve that.

And I will also cover how I integrated the Elephorse in an environment as you would do in a shot context in a VFX company.
 Choosing your references :
Whenever I do a project that I know will take me 2 or 3 month to complete, I always try to stay close to my first idea. While looking for new references as the project goes on, I always try to find ones that will enrich my original concept.
When I first started this project I had this idea of a horse with the body proportions of an Elephant but with a smaller trunk. A bit like watto from Star Wars. Which was himself inspired by a Tapir. And two head to keep her in a fantasy Universe.
I didn't know what color I wanted. The only thing I knew was that I wanted her to be in the same universe as my previous project : The Gorillon.

Only this time, instead of having 1 UDIM 4k and projecting alpha straight inside zbrush. I wanted to push the process a bit further. This would allow me to get more detail and to be able to push the texturing, sculpting and lookdev more.
Initially, choosing venomous frogs as a color reference seemed like a good idea to do so. That said, it turned out to be more difficult than expected to find the right balance. Plus too many good references but going in opposite directions.

The model :
I used Mari for its flexible side. But because I don't have an extremely powerful machine, I found that 6 UDIM is a good compromise between quality and size of the project. And For most of the maps, I am also working in 4096x4096.

TIPS : When you do the uvs, do it from one side only, then duplicate your mesh. You will then be able in mari to mirror easily between the 2 sides and save a lot of time.

- Combine the height/bump/cavity in Nuke in order to project them all together in Mari. Project all the maps on different layers so their intensity can be managed separately if needed.
The microDisplacement is the first map painted. From this one you will be able to create all the other maps.

Tips : You can start everything partly at the same time. Going back and forth between Sculpting, texturing and Lookdev. One will feed another. And It personally helps me a lot !
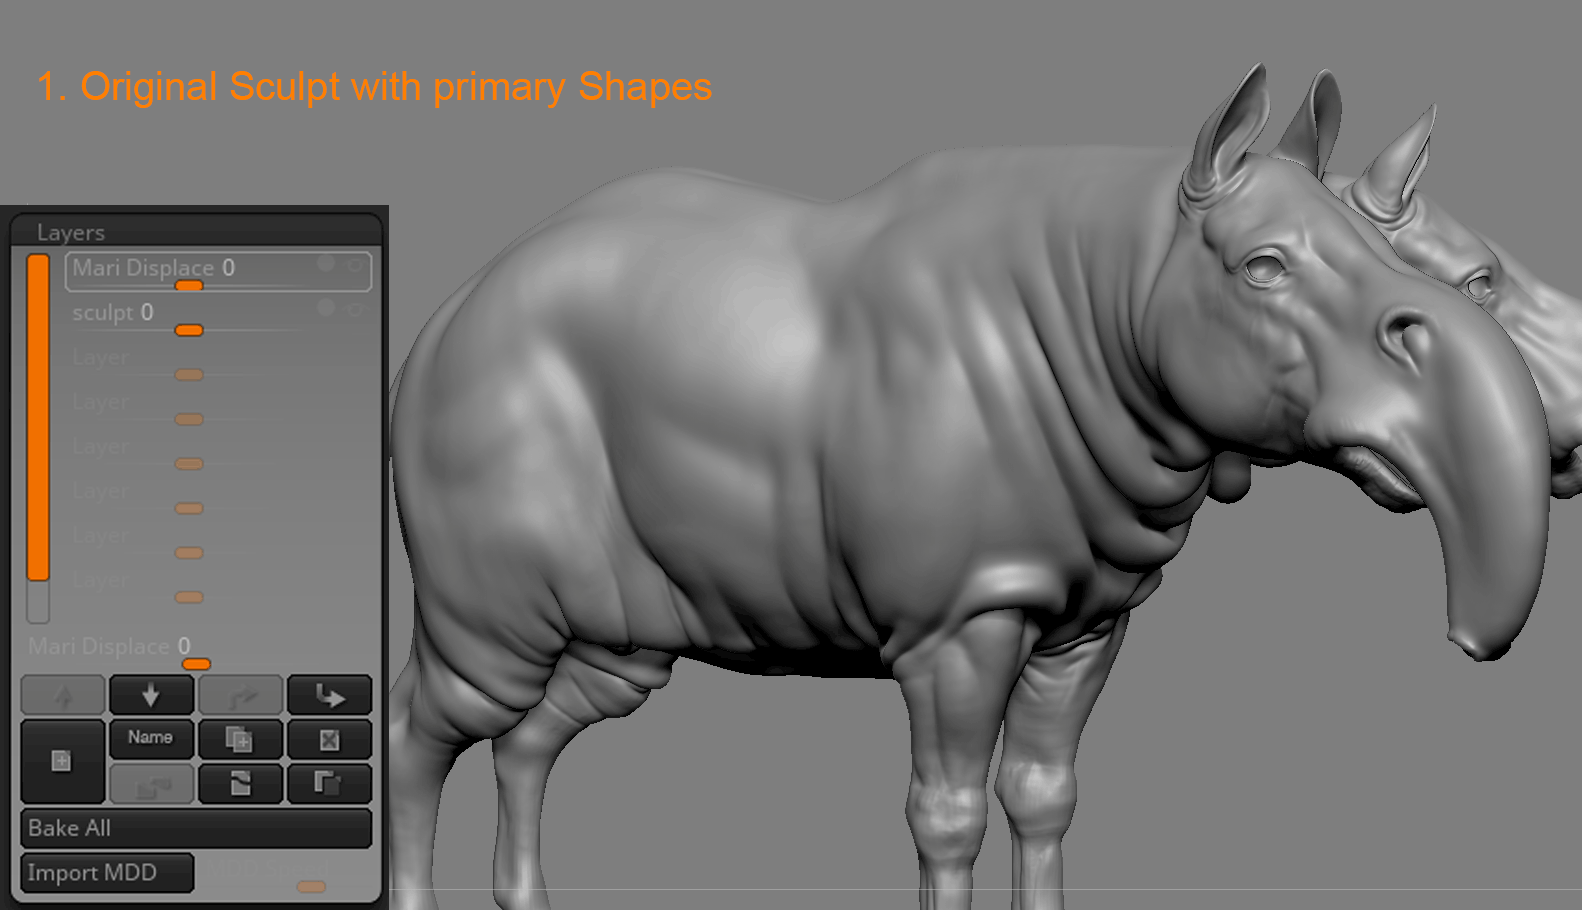
The displacement map :

There are 2 different techniques to sculpt the secondary forms and refine the primary ones using the Displace from Mari.
- The first one well known but also very heavy and non flexible, is to bring your maps from Mari. Project them in Zbrush to then sculpt on top of it. And then export it from Zbrush to use it as a single Displace in Maya. But if you want to keep all your details, you will need to split your model into 5 or 6 subtools. Which means it will be really difficult to do any major change on your project.
The technique i used, more flexible, is the following one :
- Import the microDisplace from Mari in Zbrush
Tips : To do so, you can use Jake Harrel UDIM Importer for Zbrush which is a big time saver. Especially if you have a lot of UDIMs.
- But instead of baking it, I keep it on a separate layer that I don't touch.
- Use this layer as a guide. It is extremely important to use this map not only for secondary shapes. But also to refine your primary shapes. One of my mistakes when first started was to zoom in and focus only on the small wrinkles. Without thinking of the overall shapes.

Tips : Using a morph target before you start sculpting will help you be more open to try without risking breaking up everything. You can then erase and restart as many times as you want.
- Then when you are happy with your sculpt, you can export your displace. (Make sure to hide the layer with the maps before exporting)
- In Maya, you can then use both your displace coming from zbrush and Mari and manage your 4 channels separately.


Diffuse maps
- I select a constant color. Add some grade and color correction using cloud/turbulence/oil mask with different size to break up the constant color.

- I do this for all the primary colors i will have on my creature (in this case i had 4 differents colors)
- After that I paint masks to mix them together and create the patterns that I want.
- I then mix the masks I have painted with the displace channel to break up the shapes.

Tips : when using your Displacement, hold shift+ctrl to clone it. That way, if you have to update the map, it will automatically update your diffuse color. So don't feel like you have to finish your Displacement before starting your Diffuse color. They will in fact help each other during your creative process. And since it is an instance, it is much lighter.


The workflow I use isn't perfect, and you have many ways to achieve results. Some people will prefer to paint their Diffuse inside Zbrush. But personally it suits me better because it allows me to stay flexible.
As you can see I struggled a lot with the colors. But what I like about this workflow is that I was able to make these changes without losing any work.
You can also check Antoine Verney-Carron and Gael KerchenBaum’s making of. They also covered this subject and did a really great job.

The Integration :
I also decided as well for this project to push it a bit further and to integrate the Elephorse into an environment to push the story-telling. plus i find it is a really funny way to test your lookdev in shot environment.
Tips : The following steps will be used for a still frame, But can also be used for an Animation. This is why I use Nuke over Photshop. But feel free to use Whichever you want depending on your needs.
I chose two different places :

- A desert, where the Elephorse seems a bit lost.
- A forest, which is her natural habitat.
The reason i decided to use photos with Elephant on it is so i could use it as a reference :
- for the lighting (direction, intensity, colors, shadows)
- As a scale and perspective reference.
I Picked up a few pictures I liked and I thought it would work with my creature.
- Remove the Elephant from the picture (but keep the one with to use as a reference).
- Create a floor in Maya to get the horizon right and guess more or less the focal length. (If your plate has an Uneven floor, match it for a better result). Then Duplicate it.
- Apply a Lambert to your First floor with more or less the color of the plate. Primary visibility needs to be Off. It will create light bounces on your model.
- If not enough, you can always use secondary lights to get nicer reflections and avoid dark areas.

Tips : Using additional lighting is not cheating. It is actually a common thing used on Cinema Sets (they are called Reflectors). And it helps getting a more artistic result. Which is what we are looking for here.
- Apply a Surface Shader to your Second floor. Connect a Shadow matte and an Ambient Occlusion to get The shadows of your Creature. You can then use them as a Mask in Nuke.

Tips : Use an “Exposure” node instead of a “grade” to create the shadows in Nuke. You will get a Nicer result.

- Adjust the exposure and tone of your creature using the Elephant as a reference.


Tips : for the lighting, you can find an Hdri matching your backplate on hdriHaven. There are free with an incredible quality.
You can bring it back to photoshop and do some paint over to add some extra shadows and small grass on the feet until it feels like the Elephorse is in the picture.
And that is about it !
I hope you find it useful.

| We would like to thank Nicolas for his helpful contribution. If you're also interested to be featured here on a topic that might interest the community, feel free to contact us! |