


Gael Kerchenbaum is a Senior Freelance Creature Artist focusing on modeling, texturing and lookdev. He started his career working at MPC, where he worked on Jungle Book. After this first experience, he moved back to France and decided to become a freelancer.
Being passionate by animals, Gael spent a lot of time learning anatomy from other artists, scientific and veterinarian. Between movies, cinematics, advertising, and 3d printing, Gael is trying to make his way through different industries. He had the opportunity to work for Noemotion, Axis Animation, Capsule Studio, Untold, One Of Us, 3dtotal… and has been part of the CGMA mentors for more than a year.
About the Artist:
Hi everyone!
Before I introduce myself, I would like to say thank you to Jeremy and TexturingXYZ. Thank you for this interview, and for everything that you have been doing for 4 years. Your work has changed the way we work in VFX and has helped me to bump up my career.
My name is Gael Kerchenbaum, I am Senior freelance Creature Artist and teacher. I’ve been part of the CG industry for 5 years, with experience in VFX, Cinematiques, 3D Printing, and lectures.
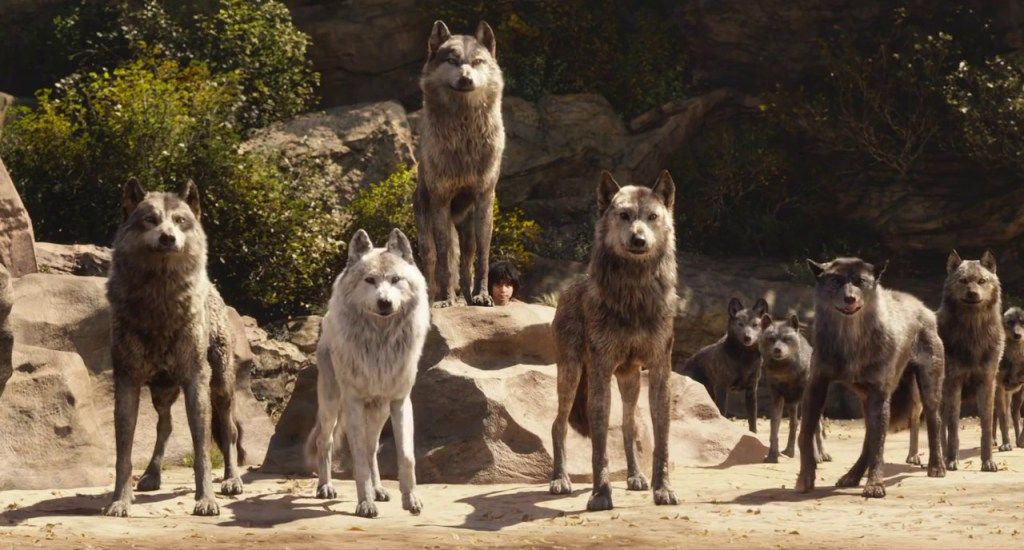 Work done at MPC on Jungle Book. I was part of the people who modeled the Wolves.
I started my career as a modeler at MPC, where I worked on the creatures of Jungle Book. Following this great experience, I wanted to leave the industry for a bit. The idea for me was to become not only a creature modeler but a complete Creature Artist. I wanted to feel more ownership over my work.
When you’re in a VFX school, you learn how to put your hands on a full production pipeline. The work that you’re doing fully belongs to you and you can definitely feel ownership of your own Art. However, you’re missing the professional skills that could make you proud. MPC was some kind of secondary school. It taught me the technics so I could be confident when going back to personal pieces.
After a year of work there, my contract ended so I decided to move back to France. I took the decision to become a freelancer. The beginning was hard and terrifying. I stayed unemployed for 6 months. I find a couple of opportunities here and there; the kind of jobs that will never be shown on a portfolio. This was hard, but a great way to force myself to learn CG in general.
Eventually, I found an opportunity to teach during a Workshop in a school. This leads me to another school, then a third one and so on… Behind surrounded by students is tougher than most people would think. You have to be and to feel legit. It is really important to prove your value as a teacher. This experience also forced me to learn a lot more about CG and Art that I initially wanted to. During this time, I took the opportunity to strengthen my portfolio; so I learned quite a lot of thing about Anatomy.

Creature I did for PCStoys. I took care of the modeling in ZBrush and the talented people there did the rest.
Anatomy for me was a real bridge between modeling and texturing. At the beginning, you’ll have to start to learn how to sculpt primary forms. Then you’ll move on to second forms.
Eventually, you’ll make it to tertiaries and micro details. That’s basically what guided me from modeling to surfacing. Being able to understand what is happening at the microscopic level on the skin of my creatures makes me want to know how to transpose these details from a volume to color and shading. That's were my relation with TexturingXYZ began and made me the Modeller and Texture Artist I am today.
 Release the beast I did for Noemotion.
Thanks to all the things I learn through teaching, self-training, and practice, I get the opportunity to become an actual freelancer. I worked for Noemotion, Bacon Pictures, Capsule Studio, Axis Animation, One Of Us, 3dtotal… And get the opportunity to share the knowledge of Anatomy and Texturing thanks to the CG Master Academy, an online school, where I am teaching for a year.
 Work done for Axis Animation. I did the modeling and texturing on this Griffin.
BreakDown / Workflow(s)
Most of the people know me because of the creatures I did and shared on my portfolio; especially thanks to the in-depth tutorial I wrote for TexturingXYZ. Release the beast was my first great piece. I made it by following the great workflow from Javier Bianco and decided to do a more in-depth step by step.
Even though my technique has evolved since then, the global workflow remains the same. This project defined a lot to me. However, because you can already have access to the full breakdown, I thought it’d be more interesting to share with you this third version of my T-Rex.

 T-rex I modeled, texture and rendered for Axis Animation. Thanks Jeremy Celeste for the look dev tips!
This dinosaur was done for Axis Animation. It was my first full XYZ monster because Release the Beast had a bit of Surface Mimic in it. Something important to know is that TexturingXYZ redefines the way we approach details on organic pieces. Before, we could have been scared about building a Creature for close up; nowadays doing skin pores or tertiary details is something that is taking the lowest amount of time in my overall workflow. However, in order to work, it needs to be prepared carefully.
The modeling aspect of a Creature :
I’d like to speak a bit about planning the work here. Before starting on a creature, there are different questions you’ll need to ask. Answers will have to come either from you or your client/sup. Here are just a few I’m always asking:
- What is the scale of the production? Are you working for VFX, a cinematic, advertising, or a really short term contract?
- What is the budget for this creature? If you’re a freelancer, always be aware of the envelope from the client and your daily rate.
- Will the creature be covered by fur?
Once you answer these questions you’ll be able to plan on the amount of time for each step. I believe the concept sculpt to be the most defining stage on a Creature. You want to spend 1/3 of the global modeling time on it. Once done, you’ll have to spend time on the retopology. Do not miss that one. A good topology will define all the rest of the production. Besides, it is also indispensable for your texturing workflow. With wireframe, you establish the key edge loops to unwrap your UVs. A good UV layout will save a lot of time when moving on to the surface details. If you want to make sure that your model will be close up ready, here are a few tips:
1- Start by unwrapping the UVs.
2- Apply a 4k UV checker on your model.
3- In the viewport, place your camera the closer to your creature to where it will be in a shot.
4- In your UV view, select all of your UVs and scale them until the checker in the viewport is becoming clear and sharp.
5- You now have defined a good texel density needed for your UVs. Now, cut your model into different shells and place them into UDIM squares.
6- do a fully symmetrical UDIM layout to save tons of time of production.

This workflow, however, is not ideal when working on a small scale project, like Cinematiques or Commercial, and when your creature is covered by fur.
This will give you a regular texel density. However, imagine that you need to work on a furry animal, which is covered by fur, you’ll be able to break the regular density and add more definition only in the area that needs attention. This is something that I am doing on a lot of productions. It makes you focus only on keys area where you’ll need skin pores like a nose, around the eyes, inside of the mouth, paws, etc… This is where your TexturingXYZ files will become amazingly useful.
 Personal project. Made to teach texturing to my CGMA students.
Once you’re done preparing your model, you’ll have to switch between the modeling and texturing worlds. Using texturing XYZ, you’ll simply have to project your combined displacement files in Mari. There are two types of files on the store you’ll be able to use here: from Human or Creature. If you need to work on a furry Creature, you’ll be able to use human maps. A while ago, I wrote this tutorial to explain to you how to combine maps for the standard human skin pores packs, you’ll be able to find it here: https://texturing.xyz/pages/surface-displacement-maps
However, if you want to understand how to combine files for Creature displacement, I also recorded a free tutorial on YouTube:


 This Fox was done at One Of Us. I took care of the modeling and texturing. The look dev was done by Justin Long. Grooming was done by Andrea Umberto Origlia and Ceylan Shevket Shawara.
The Texturing aspect:
There’s is something I keep telling to my students when teaching them texturing. It is really important to replicate all of your surface details into all of your maps. I believe the procedural approach to be the best for that. It is also the only approach that is not destructive and allows you to tweak your texturing quite quickly.
For this reason, my texturing workflow is only based on Masks, and that’s where XYZ displacement also shines for me. Have a look at the following creature I did for Capsule Studio and Axis Animation. You’ll see that all the details present on the surface will create some color information. This is automatically handled within Mari. The workflow is quite simple and fully explained in my Release the beast tutorial


I’d like to share with you this breakdown of a Fox I modeled and textured for One Of Us. The following picture basically shows you how I am building all of my albedo maps. The steps are as following:
1- Use a tileable procedural layer in Mari with a marble texture.
2- Put it in a group, add a procedural color in multiply mode. Select the primary color for the skin of your creature.
3- Duplicate the previous group. Select your former color layer and choose the second most import hue of the skin of your creations.
4- Do a right click on your group, mask, hide everything.
5- Paint the area where you want to reveal this second color on your mask. You can also your Ambient Occlusion to reveal automatically the color.
6- Redo the same operation until you’re satisfied with all of your primary colors
7- Use a first HSV to darken the colors. Put a procedural cloud into its mask. Play with the size and roughness to randomize the repartition.
8- Use a second HSV to brighten the colors. Put a procedural cloud into its mask. Play with the size and roughness to randomize the repartition.
9- Add a new HSV to add darker colors. You can add a bit of redness to it. In its mask, share your TexturingXYZ displacement map and control its contrast with a Brightness Look Up.


I did not integrate all the substeps, but they should come to you pretty clearly. This procedural approach of an Albedo will grant you with great result. The advantage with that is that you’ll let the surface guiding almost all of your colors information. You’ll only have to focus on the primary and some of the secondary colors. This is just like modeling. We want to spend production time on tasks that are the most artistic friendly (Primary and secondary volumes, Primary and secondary colors).
Then, we want to spend the minimum amount of time on the technical aspect. The other great advantage is that, if you want to change only one of the color of your creature, you’ll be able to do in an instant. Let’s say that you also need to update your surface details. Then you’ll simply need to update your TexturingXYZ displacement map and all of your texturing will automatically inherit from the changes. Sounds like magic!


This Fox was done at One Of Us. I took care of the modeling and texturing. The look dev was done by Justin Long. Grooming was done by Andrea Umberto Origlia and Ceylan Shevket Shawara.
Another approach for concept sculptors:
What I shared with you before was my workflow using TexturingXYZ as a key to control all of my surfacing work. However, this is a production Workflow. This means that it can take several days to finish and will lead you through different software. There are multiple ways of using XYZ files. One of the other approaches I am teaching to my students during my CGMA course is to do all the surface within ZBrush. This will definitely be more appealing to concept sculptors.
Basically, you’ll want to split your model into different pieces. Those subtool will have more or less the same amount of poly. The reason behind this is that you want to get a model with hundreds of millions of poly. This will give unwrap the possibility to sculpt the high frequency. ZBrush can’t go above 80M per subtool, unless you’re using HD Geometry but that’s a different story… besides, I do not recommend you to use it unless you already know how to handle it very well.
 Personal Project. Dragon done to teach creature anatomy, modeling and texturing to my CGMA students.
As an example, this is a creature I made for my course. This guy is a mix between hand sculpting, hand a lot of XYZ textures. What I did was to transform the Displacement and Bump files into alphas. Then I simply applied them on my model. Here’s my workflow when needed to convert a map to an alpha:
1- Open your XYZ’s Displacement/Height file into Photoshop
2- Go in image, mode, 16 bit. Click on Don’t Merge on the window that just opened.
3- Drag n’ Drop your Bump file on your Photoshop working file, to put it on a new layer. Put this new layer in Overlay mode.
4- Reduce the opacity of your Bump map. You’ll have to test the intensity of your tertiary later with ZBrush.
5- Crop a square region of your map.
6- Save your file as a .tif, no compression (otherwise ZBrush will not read it), with the layer flattened.
7- Do a CTRL+Z to undo your crop, and redo the two last operations for each patch you want to convert as Alpha.
8- In ZBrush, select a standard brush, put its stroke mode in Drag.
9- In Alpha, import your patch. Then go in Modify. Put the Mid value at 50. Add a bit of Rf (radial fade) to mask the borders.
10- Now, simply drag and drop your pattern on your model.

This dragon was also fully painted in ZBrush using polypaint. Basically, the workflow is really similar to my Mari approach. I always start to work on the primary colors that I apply with a Standard brush in RGB mode. Then, I move on to the secondary colors. When you buy a Creature Skin pack from texturingXYZ, there’s an amazingly useful map that cannot be used on its own. I am speaking about the Albedo map.
This one is incredibly helpful when you want to understand what is the rough and pure color of your creature. If you observe it really closely, you’ll see that there are patterns that happen more or less in the same manner. For example, looking at scales, you’ll be really likely to get dark cavities where your scales are really bright. On the opposite, you’ll also find bright cavities inside of scales that are really dark.

Again, now that we have access to all of the surface details because they have been sculpted, we can use it to enhance our polypaint. Here’s a quick workflow to paint scales and cavities:
1- Put your model on the highest Subdiv.
2- Go to Subtool, Masking, Mask by Cavity.
3- Do a Cavity mask with the default setting.
4- Go in the Render palette, click on Flat. You’ll be able to see your mask more clearly.
5- Go back to your Mask options, and customize it a bit.
6- Use this mask to paint outside of the cavities. Invert it to paint inside

7- You can also use the Mask by Peak and Valley to create wears and tears color effects.

8- Blur you mask with the Mask Adjust options.
Credits / Miscellaneous
I’d like to say a huge thanks to all my colleagues and clients. We always had a good relationship. So thank you for your trust, and all the fantastic Creatures you asked me to do!
I would like to thanks One Of Us and all the people I worked with there. Thank you Ceylan for your trust and for giving me the opportunity to share breakdowns of the Fox we did together.
A huge thanks to those who guided me during my career. Jeremy Celeste and TexturingXYZ, Brendon Isaiah, Julien Nicolas, Mhamed Elmezoued and Stephane Montel from Capsule, Miguel CBT, Ewan Wright from Axis… and all the people I miss.
And finally, thanks to Lena, my fiancee, for supporting me every day and making me a better person.
https://www.artstation.com/gaelkerchy
https://www.instagram.com/gael.kerchenbaum/
https://www.youtube.com/user/gwelkerchy
https://www.linkedin.com/in/gaelkerchenbaum/
| We would like to thank Gael for his work and helpful contribution. If you're also interested to be featured here on a topic that might interest the community, feel free to contact us! |